Monday, January 25, 2010

Slow Cooked Chicken Chili

So, I got a crock pot. (aka 'slow cooker' if you want to use the term everyone seems to be trying to use to pretend like these things aren't the same appliances that reminds everyone of the 70s). I'm excited, because I like soups and stews and the kinds of thing you can make in one, and the idea of having dinner waiting for me when I get home is awesome. So, I've been trying a few things (and created a few definitely non-bloggable things along the way), but here's my first official recipe (drumroll please)...

This recipe came from Savory Spicy Sweet, which was also the source of the awesome Balsamic Lentils, and apparently she got it from Pink Parsley. Here it is, with my modifications:

2 chicken breasts, completely frozen
2 cans white beans (drained, rinsed)
1 can black beans (drained, rinsed)
1 can chopped tomatoes (juice and all)
1 small chopped onion
2c salsa (I used medium, if I were you I'd use spicy since it was diluted)
2tsp cumin
1sp salt
1tsp red pepper (more/less depending on salsa)
1 red pepper, chopped

Put chicken, beans, tomatoes, spices, onion all in the slow cooker- I was doing this on a Sunday afternoon, so wanted it done in about 4 hours- so, I cooked it on high. If you wanted it longer, just cook it on low as the other recipes do (for what its worth, I'm sure this would be fine cooked slowly on the stove, but in that case you might want to do things like not use totally rock solid frozen chicken).

When about an hour is left, take the chicken out, shred it, and then put it back in. When you do, add the peppers. Also, do a seasoning check.

Serve with cheese, avocado, tortilla chips, whatever floats your boat. As you can see in the picture, I had mine with some beer bread, which I am now obsessed with. In addition, the original recipe had pepperjack cheese in it, which I think might be good, but I didn't have any, and I kind of liked that one of the benefits of the slow-cooking approach here is that there was no added fat.

It was delicious! I highly recommend it!

Saturday, January 23, 2010

Pancake Time!

You know, sometimes you just want pancakes.

These pancakes are easy, pretty guilt-free, and yummy- what else can you ask for? It also makes a perfect sized batch, and doesn't require boxes of mix or any of that extra stuff that I never seem to have around at the exact moment I'm craving these.


The stuff:
1/4c oatmeal (NOT steel cut oats)
1/4c cornmeal
1/2c nonfat yogurt
1 egg white (or one egg)
1/2tsp baking powder
1/4tsp baking soda
cinnamon

optional:
blueberries (just dump the frozen ones in there, still frozen)
half a banana
chopped nuts
vanilla
anything else you can imagine

What to do with it:
Basically, mix everything up in a bowl. Heat up a skillet/griddle, with some butter-like substance (I use Earth balance). I divide it up into 4 pancakes, because they fit on my griddle, but these are substantial! Cook on a fairly low temperature- when bubbles appear in the middle of the pancakes, flip. Cook until they're brown and done.

I topped them with Cranberry-apple butter from Trader Joes, because I freaking love that stuff. But, you could also use syrup, jam, microwaved frozen fruit which becomes kind of juicy, peanut butter, or whatever else it is you like on your 'cakes. One note- this doesn't make tons, but it is easily pancakes for 2- the pancakes in the picture are from an (approximately) 3/4 batch, and it was still a lot. But, you could easily freeze any extra ones if you wanted. Or, just eat a lot of pancakes, they're not that bad for you anyways!

These are really good- they kind of have a multi-grain like vibe to them, and especially if you load them up with delicious fruits and things, they're much more filling and substantial than plain pancakes... try them, they're good!

Thursday, January 21, 2010

Chickpea Tomato Quinoa

Have you gotten on the quinoa bandwagon? (I believe the bandwagon left the station sometime circa 2005, so this is not new news, but I'm still on it so here you go).

Basically, its awesome for you. Its a complete protein. Its high in fiber and protein. And, its yummy. So, there you go. This dish is the perfect package for the quinoa- its hearty and tasty and you could take it in a lot of directions and run.

(the picture turned out badly, so you get this extra jazzy version to make up for it).

-some olive oil
-1 onion, chopped (mine was very small, and it was fine)
-.5tsp cumin
-2 tablespoons corriander/cilantro seeds, smushed a bit with the back of the spoon to break them up
-red pepper flakes
-3-4 cloves garlic, chopped
-1tsp salt
-1c quinoa (I get mine at Trader Joes near the pasta)
-1 can chopped tomatoes (unsalted), including the liquid
-1 and 1/2c broth (I used chicken, you could make it vegan with veggie broth)
-1 can chickpeas/garbanzo beans, drained

Heat the oil and brown the onions. Once they're pretty brown, throw in the garlic, the corriander, cumin, red pepper flakes (to taste), and salt and cook for a few minutes. Then, toss in the quinoa and heat it up for a few minutes. Put in the tomatoes, chickpeas, and broth. Let it boil for a minute then turn it way down and cook for 20 minutes.

This is delicious! And, you can see I've served it with my beer bread, which I am still completely enamored with.

Tuesday, January 19, 2010

Beer Bread

Oh man oh man oh man!

I'm always trying to figure out some miraculous fast way to make bread at home. I have tried things like this whole artisan bread in 5 minutes a day kick people were on, I've tried other fast and easy tricks. And, let me tell you, I have made a lot of bad bread (see Exhibit A. it was not delicious. it looked like a giant cow pattie. it did not look like the picture on the internet. neither did any of the rest of the ones I made).


Exhibit A.

BUT. This, this might be the answer. And, of course, the answer involved beer.

This is suuuuuuuuuper easy:
1 bottle beer (I used Sierra Nevada IPA because thats what I had)
3c flour
.5tsp salt
1tsp baking powder
1/3c sugar

Stir it up. Put it in a loaf pan. Let it sit for like half an hour to an hour if you have time. Put it in the oven at 350, and bake for about 1 hour. If you want, 3/4 of the way through you can spread butter on the top of it.

Check this out! Its not deformed!


And check THIS out... (DRUMROLL, PLEASE...)

Yummmmmmmmmmmmmmmmmmmmm

(ps. if you have self-rising flour, use that. just skip the salt and baking powder)

Sunday, January 17, 2010

Stealthy Joes

I love sloppy joes... they remind me of summer, and vacations, and sitting around the table with my family laughing. Unfortunately, I do not actually really like beef, which as you may remember is a pretty core component of your standard joe.

There are a lot of recipes for lentil based sloppy joes out there, and, as you may remember, I really really like lentils, for both their diversity and their budget friendliness and also, because they have no fat and are super high in protein and fiber. Here is the recipe I went with....


1c lentils- cook in 4c water (or 3c water, 1c broth) until soft
1 medium onion, chopped
1 red pepper, chopped
2 cloves garlic (or some of the pre-chopped stuff)
1-2tsp oregano
red pepper to taste (I bet you need more than you think)
1 tsp salt
1 16oz can tomato sauce (I like 'em saucy. some people might use less)
4oz tomato paste
2 tblsp brown sugar
1 tablespoon mustard (or, if you're me and your mustard was elderly and questionable, some mustard seeds, vinegar, tumeric and salt to make some fake-out mustard. why don't I own mustard powder when I feel like I have every other spice known to man? the world may never know)

Basically, brown the onions, peppers, and garlic. Add the spices, then put in the cooked lentils, tomato products, mustard (or bastardized mustard), and sugar. Let it all get to know each other for a while. Then, serve it over the carb of your choice (see below)

You could use any kind of bun, bread, or even rice. If you're wondering what I used (not having any regular bread products on hand), its a paratha a layered Indian flatbread thats super delicious. Unlike my previous flatbread making attempts, I bought this frozen at the Indian grocery and am completely happy about it.

Thursday, January 14, 2010

Chicken/Rice/Butternut/Spinach... ROUND TWO!

Ok, so I last posted about a yummy tower of brown rice, butternut squash puree, a chicken/pepper/onion mixture, and spinach. I had leftovers, and wanted to eat them, but... making the whole tower all over again and heating up all the parts just seemed like too much work. Plus, it was cold out. Plus, I wanted soup.

So, enter round two... soup!

Basically, I took some chicken broth, tossed in the puree, the chicken mixture, a few spoonfuls of rice, and some more of the spinach (along with some red pepper flakes and smoked paprika to kick things up a notch) and let it simmer. It was sooo goood!

The lesson here is, think outside the box a bit with this whole leftovers thing. Getting to have all the flavors in a whole new format can really revive them!

Tuesday, January 12, 2010

Butternut Squash and Spinach and Chicken and Rice and mmmmm...

All right, all right, I know that I may have kind of overdone it with the butternut squash this winter, since its come to you already in the form of pizza, and pasta, and strange wheatberry concoctions... but THIS is totally different, and totally delicious, and you should totally try it (plus, I can't be blamed for the squash this time, the meal was the inspiration of my co-chef).

Anyways, this is a rendition of one of those fresh prepared meals at Trader Joe's, which are usually really good. It was inspired by that, then helped along by this recipe, which is pretty similar. SO, here is our version...
The stuff:
2 chicken breasts (I used frozen)
1 red pepper, sliced
1 small onion, sliced
some garlic
1 butternut squash
1c brown rice
fresh spinach leaves
some chicken broth
sage (I used dry, fresh would be good too), salt, pepper, olive oil
(red pepper flakes, optional)

What to do with it:
Squash
-Peel and cube one butternut squash. Toss with olive oil, salt and pepper, and roast at 400 until all nice and soft and browned.
-once its done, put it in a food processor or blender with some additional spices, and about half a cup of broth (or, whatever amount you need to put in to get it to blend it)

Rice
-cook 1c brown rice in 2c water (add a little onion, and spices, if you want)

Chicken
-Coat chicken with olive oil, pepper, salt, and sage- defrost. cut into chunks.
-Brown onion and a little garlic
-Toss in chicken. When the chicken is almost done, put in the red pepper slices
-Pour in some chicken broth, to make a little light sauce. Toss in the red pepper if you'd like it.

Spinach
rinse and prep some baby spinach leaves. you might even chop them very coarsely

Putting it all together..
Make a little bed of rice, top with butternut squash, chicken/onion/pepper mixture, and top the whole thing off with the spinach.

This was nice because it was warm and the sage and squash and everything make it nice and comforting, but at the same time it wasn't too heavy, and the fresh spinach was really a nice addition... when you stir the whole thing up together it becomes yummy and unique. Try it!

(ps. I liked the chicken, but if you wanted to veggie-fy this, I'd recommend taking some white beans and cooking them with garlic, salt, pepper, olive oil, and sage and using them instead of the chicken- if you did that, it would actually be vegan).

(UPDATE: ok, so it seems that the good people at Trades Joe's may actually season the squash with Indian-style spices rather than sage. I think that might give it the little kick this needs and will probably try it next time)

Sunday, January 10, 2010

Tumeric Scramble

Today, I was reading an article on "The 11 Best Foods You Aren't Eating". Although, actually it turns out I'm eating a lot of them. Except beets. Beets are gross.

At any rate, one of them is tumeric, and as you may remember I am the new owner of half a pound of tumeric. I use it for curry-type dishes, but the article suggested mixing it into eggs. I love eggs on the weekend, so figured why not.

Basically, I browned a bit of onion in olive oil, tossed in some frozen spinach, and added eggs (well, really, part egg whites, and 1 whole egg), salt, pepper, and tumeric.


You can tell there is something in there because the eggs are a bit more yellow that you'd think, given that they're mostly egg whites. (one of my secret favorite things about tumeric? if you squirt it with cleaning fluid, if it gets on the counter, it changes from bright bright yellow to bright red). These were really good, the flavor was subtle, but it really added a little something extra to the eggs... this is the kind of thing secret recipes are made of! try it!

Saturday, January 9, 2010

TRIUMPH!

I really seriously can't contain myself. Today I got up, and what did I see on the ground, my little lime!


He's pretty much full sized, and its the right time of year so... I think I finally successfully raised at least one lime off of that tree to 'adulthood'. Of course, now the problem is that I have to think of the best possible thing to do... its a lot of pressure! My immediate thought is obviously margaritas. Unforunately, he was an only child, so it would be a very small margarita. So, I have to think of as many awesome things as possible that just need a spritz of lime (and zest). Stay tuned!!!

Saturday, December 19, 2009

Butternut Squash Pizza

Ok, so, I seem to have redirected my obsessions with roasted butternut squash, toasted walnuts, and gorgonzola- which have previously been seen together in a wheatberry based format this time, into pizza.

Basically, this is the story:
--herb pizza dough from Trader Joes- you could make your own, or use a Boboli-type crust, but this stuff, which comes in dough form, is just awesome. roll it out, and coal with olive oil.
--1 little pack of butternut squash, also from TJs. or, just roast one, but that is going to be a much bigger commitment. cook it in the microwave until its really soft, and cut into even smaller pieces.
--a few handfuls of fresh spinach
--some crumbled gorgonzola
--a handful of toasted walnuts
--a shallot, sliced, and browned

Roll out the dough, brush with olive oil. Spread the spinach leaves, then layer on squash, gorgonzola, walnuts, and shallots. Sprinkle with pepper. Bake in 400 degree oven until crust seems done.

You'll note that this is not a cheesy pizza. You can add a bit of shredded cheese to hold it together (since you're already going to TJs, I get the Quattro Fromagio)- but, I only added about a quarter of a cup on the entire thing. There are so many flavors, its kind of nice to enjoy them and not have the focus be a pile of cheese (not, for the record, like I'm ever opposed to piles of cheese).

Anyways, if you want something warm and comforting, and a little different, this pizza's your man!

Monday, December 14, 2009

The Mother Lode

I think we all know that I'm a sucker for a deal on spices. This is mainly because if you're going to cook on a budget, you're going to need to take action to keep things interesting... very cheap ingredients (lentils, beans, grains, and so on) can take on a huge range of flavors if you do things right.

Well, this weekend... I hit the mother lode. A friend and I went to an area of town full of every kind of Indian store you can think of- clothes, food, groceries, everything. (this, by the way, is why I love L.A... I spent the morning there, then went to little Ethiopia for dinner, then I came home to my place, which is in little Brazil). ANYHOW. Check this out... I think I may never need to buy cumin, ever, for the rest of my life. This beat the ethnic section of my regular grocery store, which I had previously been all excited about, hands down- $1.80 for half a POUND of cumin? Holy smokes!

I got a couple of things I'm particularly psyched about...

1. cardamom pods
Why am I all excited about this? Mainly because I find cardamom fascinating- my family is Scandinavian, and growing up, I completely associated the taste with desserts made by my Grandmother (in addition, it is an ingredient in Glogg, which is the spiced wine you'll find on the stove of everyone I'm related to during the holidays). Only as an adult did I learn that its a huge component of Eastern cooking as well- I had this very surreal experience at the home of a friend, when her Mom used it in a rice dish- it took me half the meal to figure out what the strangely familiar flavor was. And only 10 minutes ago when I googled it, did I learn that together the Near East and Scandinavia consume half the worlds cardamom. I really like the idea of these two completely diverse regions and cultures independently landing on a same favorite spice. Plus, apparently its related to ginger, and, I do love ginger.

2. Garam masala
in seed form:
I didn't even know you could get this. I always have garam masala on hand, but its usually a mysterious powder. Now, the mystery is unveiled and I can see all the raw components (of course, I have to figure out how to grind it up, but thats another adventure).

3. Moong beans
One of my favorite things is to buy ingredients I've never used before, and just figure out what to do with them once I'm home. Thats not totally the case with these beans because I'd heard you could use them for daal. But, I've definitely never cooked them myself, and just spent part of the evening looking around for recipes. A pot of daal is currently bubbling on the stove, destined to be my lunch tomorrow if it works out. If its edible, you'll be seeing it soon! (it smells good, so my hopes are high).

Sunday, December 13, 2009

Search Term Hilarity

So, google analytics is awesome, because it lets me see how many of you come visit, what you come for, and how long you stay. The most popular, by far are people looking for things made with adzuki beans and people who want to know about the blonde children of the corn (except that the Children of the Corn aren't blonde. thats the Village of the Damned kids. just FYI).

But, every once in a while something completely mysterious and awesome comes up, like this:

don't have a monobrow but something close to it that is bad

I'm guessing he somehow got here because of this post on monobrow.com. But, what really gets to me is the tone of desperation. I wish I could help, I really do. Unfortunately the best I can do is to advise him to seek the help of a professional, or else, just curl up on the couch with some rice krispie treats...

Friday, December 11, 2009

Peppermint Krispies, Oh My Goodness

We all know rice krispie treats are pretty much the pinnacle of awesomeness, in terms of things-that-can-happen-to-cereal. And, normally, I'm a big fan of the traditional treats. HOWEVER. This rendition of the treats is so delicious, and so holiday appropriate, you're going to need to go out and make it immediately. See below.

I wanted to make peppermint krispies, but just wasn't sure they'd work. It was important that at least some of them turn out, because I had to take them to work, because at work we have a longstanding tradition that on your birthday, the "Birthday Pirate" comes through the lab and leaves treats next to the coffee machine. He also miraculously knows the email address for the list serve and sends a pirate themed announcement of the treats. So, it was my turn to be the pirates secret helper (he's a terrible baker, really), and I couldn't make the pirate look bad. Therefore, I did the recipe in halves, but if I could go back in time (even pirates can't do that) I'd just do them all peppermint. Nevertheless, I will give you the full and accurate rendition...

Half-batch #1: Peppermint Krispies
-half a cube of butter (yeah, sorry, it makes them delicious)
-3 candycanes, crushed however you can figure out to crush them (I smushed them with a glass)
-half a bag of marshmallows
-3 cups rice krispies (I used generic krispies, because really, they're identical)

Melt the butter, and when its about half melted, throw in half the candy cane pieces. These are going to totally melt. If they look like a clumpy mess, don't panic- it'll all work out when the marshmallows go in. When the butter is melted, dump in the marshmallows. Stir pretty much constantly, until they are all just melted and its all smooth. Turn off the heat, and dump in the 3c krispies. Now, with the krispies, put in the remaining candy cane (these pieces won't melt and will look cute). Pour it all into a greased glass pan, and press down with waxed paper if you need to. Prepare to be amazed. Yum. Seriously amazing.

Half Batch #2- Chocolate Krispies
These were the back up batch, and they were great on their own, and also in combination with the peppermint. Basically, make the entire recipe above, minus the candy cane. After the krispies are about half stirred in, pour in some chocolate chips. They're going to kind of melt, and make swirls of chocolate through the bars (it shouldn't be uniform, this is part of the charm. otherwise you might as well have used cocoa krispies, which are scary and wrong). Put in pan, as above. These need to cool a bit longer than normal bars, because the chocolate needs to get hard. If you're in a time emergency, you can stick them in the freezer for a bit. These are also delicious, and totally worth making. But, make the peppermint ones, too :).

I've had a long internal debate about whether, really, the next logical step is to do peppermint-chocolate krispie treats. It would be over the top, but its just a question of whether its in a good way or not... if you try, by all means let me know!

Wednesday, December 9, 2009

Pumpkin White Chocolate Chip Cookies

OK, I made some cookies. They're not going to win any beauty contests but they have two big things in their favor. They are : 1. almost ridiculously easy and 2. very tasty.


Here's what you need (really, this is all):
1 box spice cake mix
1 can pumpkin
1 bag white chocolate chips
a little cinnamon sugar

Preheat oven to 350. Dump the pumpkin and cake mix in a bowl and mix. Add white chocolate chips until the cookie:chip ratio looks like how you would want it. (feel free to taste! no eggs = no salmonella from raw dough!).

Spoon the batter out on a cookie sheet, and then take the bottom of a glass, run it under the faucet, and then dip it in a bowl of cinnamon sugar. Use it to flatten the cookies out a bit.

Bake about 10 minutes, or until they look done.

I took these to a party, and they were a hit!

(ps. did you know there is a canned pumpkin shortage? Apparently there was a combo of a lot of rain and a small harvest, and some places are out of pumpkin (OUT OF PUMPKIN. the horror, the horror). Anyhow, if you see some, snap it up).

Saturday, December 5, 2009

Pasta e Fagioli

A friend of mine passed on this recipe which turned out to be really delicious. Its that magical combination of delicious and easy... try it! You'll like it!


The stuff:
--1 T olive oil
--6 ounces hot turkey Italian sausage (I don't usually eat sausage, but this was a key component of the flavor here. if you veggie-fy it, be sure to amp up the spices, and consider adding some extras, like sage and rosemary)
--1.5 T bottled minced garlic (how easy can you get?)
--2 cups water
--1 (16-ounce) can chicken broth (can use low sodium, fat free)
--1 (8-ounce) can tomato sauce (no salt added)
--1 cup uncooked small shell pasta, or other similarly sized pasta, like bows
--.5 cup parmesan cheese
--1.5 teaspoons dried oregano
--1/4 teaspoon salt
--1/4 teaspoon white pepper
--2 (15-ounce) cans white beans, drained
-- red pepper flakes


What to do with it:
Brown the crumbled sausage and chopped garlic in a very large saucepan, or soup-type pan. Add water, broth, beans, tomato sauce, oregano, salt, pepper, and red pepper flakes; bring to a boil. If you happen to be having a glass of red wine while you cook, pour in a slosh or two. Lower and let it simmer for about 40-45 minutes- its going to smell awweeessooommmmeee, you want all the flavors to blend and get to know each other. Stir in pasta, bring this whole thing to a boil, cover, reduce heat, and simmer for about 15 more minutes or until pasta is done- if you need a bit more water, just add it. Once its done, let settle for 5 minutes and stir in the cheese

You can serve it with a nice salad, or some crusty bread. The hands on cooking time is really minimal, but you get that nice wintery feeling of having something delicious simmering along on the stove, its the absolute perfect thing for a cold winter day!

Thursday, December 3, 2009

Wheat Berries Round III: Butternut Squash, Walnuts, Gorgonzola, mmmmm....

Well, I told you you were done with Wheat Berries, but clearly I lied.

I have to post this, because I just made it for dinner AGAIN, and I LOVE IT. It is heavily inspired by the previous 'Balsamic Gorgonzola Deliciousness' recipe, but that was more summery, with crispy apples and fennel, and this is more wintery.


The stuff:
--Butternut squash (I told you that was my new food kick!), cubed and roasted
--wheatberries, about a cup and a half or 2 cups, cooked
--toasted walnuts
--crumbled gorgonzola
--carmelized onions
--balsamic vinegar
--olive oil
--salt & pepper

Now basically, the reason that this is so awesome and delicious and easy, is that you just mix together that list of stuff, taste to make sure you like the proportions, and gobble up. (and trust me, you will gobble). But, some of that stuff is kind of time consuming, so now I'm going to share the system I arrived at for making it weeknight-friendly.

Wheatberries- now, I have mentioned these previously, and they take a LONG TIME to cook. As in, over an hour. Anything cooking for over an hour is not weeknight friendly at all. Knowing full well that I'm obsessed with these things, obviously I had to take action. So, a while ago, I bought a big bag of these little lovelies from Whole Foods, filled up my biggest pot with water, and then let them boil and boil until they were edible (1-1.5 hours). After they were cooked, I scooped them up in 1 or 2 cup increments, dumped them into individual ziplock baggies, and stuck them in the freezer- voila! microwave, and you have instant wheatberries!

Butternut squash- these little bags from trades joes are awesome. Just buy, open, toss with a little olive oil, and put in the oven at 400 until nice and soft and browned (stir as needed). Obviously its always fine to buy a whole squash, seed, peel, and cube it, but thats a lot of work.

Onions- carmelizing onions takes a while, but luckily you have to roast the squash so you have time, because just frying them would not be as delicious. Basically, stick the squash in, and then quickly slice about half an onion, and put it on LOW LOW HEAT with some butter or olive oil. cook them slowly and let them become delicious and sweet and brown (since they're on low, you can just leave them, and go over and stir occasionally).

Roasted walnuts- buy them pre-chopped, and store in the freezer. pull out a handful, put on a cookie sheet, and let them heat up while you stir up all the other ingredients

Gorgonzola- you can buy this crumbled. it is more expensive, but its in a nice sealed container, and is pretty easy to deal with, and is very week-night friendly.

The skinny:
So, here is your system- walk in the door. Toss the squash in the oven and the onions in the pan, remove walnuts and berries from freezer. For the next 30 min or so, do whatever you do when you come home, occasionally going in the kitchen and stirring the onions and squash. When its almost ready, just pop the wheatberries in the microwave and the walnuts in the hot oven. Pull it all out, dump in a big bowl, pour some olive oil, balsamic, salt, and (lots of) pepper, stir in copious amounts of cheese, and you're good to go! So warm and savory and delicious!!

Tuesday, December 1, 2009

Super Easy Walnut Brussel Sprouts

I may have previously mentioned that, against all odds, as an adult I have been converted to an unabashed, full-fledged, Brussel sprout eater.

Here is a super easy, fast, simple, delicious version ...

You need:
-olive oil or butter
-a big pile of brussel sprouts
-chopped walnuts
-salt and pepper

Slice up the sprouts so their kind of leafy (see picture). Heat up some oil/butter, and toss in the walnuts so they get a little toasty. Throw in the chopped sprouts, and saute... you want to make them get a teeny bit brown, but not soggy (overcooking them is a top cause of nasty sprouts). Sprinkle with salt and pepper and serve! yum!

Sunday, November 29, 2009

Butternut Squash Pasta

You can probably tell I tend to go on food kicks (like the great wheatberry kick of a few weeks ago which, frankly, you don't even know the full extent of because I still have wheatberry recipes in my backlog). Since its winter, the latest thing has been roasted butternut squash. There are a couple of reasons why this is so great: 1. you can eat it all kids of ways (soup, side dish, etc) 2. if you buy an actual squash, you can roast the seeds and its like a little mini batch of pumpkin seeds. and pumpkin seeds are awesome.

So, obviously, when I saw this recipe for Butternut Parmesan Pasta, how could I resist?


--1 butternut squash weighing about 1 pound OR a little bag of butternut squash cubes from Trader joes
--6 ounces of bow-tie pasta (I used whole wheat)
--2 t of olive oil (if no bacon)
--2 shallots, chopped
--1/3 cup of packed, freshly grated Parmesan cheese
--1/2 cup of chicken stock
--1/8 teaspoon of grated nutmeg
--3 slices thick cut uncured apple bacon from Trader Joes (optional; without this, use olive oil)
--Salt and pepper to taste
--Water as needed to thin the sauce

0. boil pasta according to instructions
1. Separately, roast the butternut squash if you have time, if not and you're using the little bag, thoroughly cook in microwave according to instructions
2. chop the bacon, and brown. add chopped shallots, brown.
3. put in squash, mash up. add chicken stock, and thoroughly mix to thin a bit.
4. add salt, pepper, nutmeg, and cheese. mix until smooth.
5. Divide pasta in two, top with squash mixture.

This is really good, its definitely comfort food and is a bit like grownup mac and cheese. I think though, that I'm going to backtrack to the original recipe a little more when I make it. The original involved heavy cream, which seemed a bit much and I replaced with broth. I think it needed that creaminess though- at least some milk. I'd also consider replacing the parm with a softer creamier cheese (someone in the comments to that original recipe suggested Gruyere). I also may have undercooked my squash, and in this scenario I think if anything you want to err on the side of overcooking since you want it to mash smoothly. At any rate, I'm totally trying this again!

Friday, November 27, 2009

Pie... and a triumphant return...

Ok, so I think we can all agree that my wildly optimistic "I'm going to post a picture EVERY DAY" plan was a colossal failure... in fact, it was such a failure, that I felt like I had to wait until a day when I had something REALLY REALLY good to make up for it.

Fortunately, yesterday was such a day.

Our Thanksgiving involves a lot of stuff... there is the sweet potato casserole with candied pecans on top, delicious stuffing with nuts and sausage and apricots, creamed spinach, creamed onions, 3 kinds of cranberry salad (with the pros and cons of different permutations of cranberry being hotly contested by different branches of the family), of course the turkey... and then there is pie. I got to make 2 this year... everyone wanted pumpkin, but we also decided on lemon meringue, just to shake things up- turned out, it was a hit! Its light and refreshing and just the thing after stuffing yourself with 10 different forms of potatoes.

Here they are, in all their glory:
The pumpkin pie, though, I was pretty excited about. I adapted the recipe a couple of years ago, and have been making it since- its a little non-traditional, which you can see because its the pie in the foreground...

Pumpkin-Ginger Crumble Pie
1 9inch pie

Filling
2/3-3/4c sugar (depending on how sweet you like it)
1c sour cream
3 eggs
1.5t vanilla
1 t cinnamon
1/2 t cloves
1/2 t nutmeg
1 t ginger
1 can pumpkin (not pie mix, normal plain pumpkin)

Topping
2-3T butter
about 1/2 packaged crushed Anna's Ginger Thins or other ginger snap type cookie
1/8c oatmeal
1/8-1/4c nuts
a glug of maple syrup

Mix together all filling ingredients, bake in preheated 375 degree oven for an hour. after 30 min add crumble topping. its done when a metal knife comes out clean.

The filling is nice and light, but the crumble topping really gives it a kick!

Wednesday, October 14, 2009

Cupboard Soup

Today, I worked from home, which was luxurious. Partly, because it was rainy and grey and I didn't want to go anywhere anyways. But also because I could take a break in the middle of the day and make awesome soup for lunch (and, of course, for leftovers).

Here's the soup, it was basically made out of things that existed in my fridge and cupboard:

-1 onion, sliced, and slowly browned
-about 8oz sausage (left over)
-a whole mess of chopped celery and carrots (maybe a cup or so total? originally intended for dipping in hummus)
-2c beef broth (made of beef bouillon cubes because they're smaller than cans)
-a can of crushed tomatoes (originally intended for chana masala
-lentils (because I love lentils)
-some water
-a glug of leftover red wine
-garlic
-all the rest of my delicious rosemary
-red pepper flakes
-salt/pepper


Basically, brown the onion, toss in the celery and carrots and garlic, and then the sausage and red pepper flakes. Brown it all up together.

Dump in the tomatoes, broth, wine and about half a cup of lentils (or, whatever you have). Simmer for a while, to cook the lentils, adding water if you think it needs some. At the end, add some salt and pepper to taste (won't need much salt, with the sausage and broth).

Mmmmmmmmmm.... perfect rainy day food! (picture 5!)

Tuesday, October 13, 2009

Winter is Coming!!


Today it was rainy, and windy, and brrr. It was pretty exciting, let me tell you, because that NEVER happens around here. The birds this morning seemed somewhat less excited about it. I liked how they were evenly spaced, yet also huddled together. (Day 4 picture).

Monday, October 12, 2009

Ode to Oatmeal

Today's picture is an up-close and personal view of my breakfast. You know you were dying to see THAT.

Anyhow, I love oatmeal. Love it. Its hearty, and good for you, delicious, and there are almost endless varieties. My most common incarnation is oatmeal with frozen fruit in it. I know, I know, you're thinking frozen fruit sounds gross. Turns out, when its all microwaved, its not such a big deal, and its certainly cheaper and easier than keeping tons of fresh berries on hand (although, for just eating, nothing, NOTHING beats fresh raspberries).

Basically, toss some oatmeal in a bowl with twice as much water. Throw on some frozen blueberries and cinnamon, and pop the entire thing in the microwave. Bring it out, top with honey, nuts, more cinnamon, whatever. If you need to take breakfast to work, put dry oatmeal and toppings in a tupperware, fill with water when you get there and microwave! You can even get creative- some of my favorite combos are lemon zest and raspberries, half a banana & a spoonful of peanut butter, chopped apples and cinnamon and walnuts, peaches and almond extract and chopped almonds, and just normal oatmeal with a little brown sugar and vanilla. Mmmmmmmmmmmmm...


(for my budget shoppers- don't buy in to the pre-packaging mania... first of all, be nice to the planet, you have no need for all those individual packets. Second, if you buy the big containers for less money you can get way more servings... bought on sale you're down to something like 25 cents a serving- can't beat that!)

Sunday, October 11, 2009

Rosemary, 3 ways

Ok, my day 2 picture is of this fresh rosemary I got at a friends house yesterday (I killed my one small rosemary plant. Theirs is 3 feet tall and grows in the yard. yep.)

Anyhow, it has featured prominently in my day. Its incarnations have been:

- Rosemary scramble (egg whites, broccoli, cheese, and, of course, rosemary)

- Rosemary tea - this is supposed to be anti-inflammatory among other things. Being myself, obviously I looked it up, and it turns out that rosemary oil actually IS anti-inflammatory and antinocioceptive (reduces pain sensitivity). who knew! also, I really liked it, it was refreshing.

- Herb bread. I made bread using this recipe, and threw a bunch of herbs in, which was awesome. We ate it with this Pasta e Fagioli, also awesome (and no picture was taken or it would totally be my post).

The 365 Days Project

Well, for some reason I'm in an internet meme-y kind of mood. It all started when one food blog I was reading talked about spending only $30 for food for a week (including groceries, coffee, etc). All these people were posting their menus, and I thought, $30, I could do $30 with my hand tied behind my back (only one hand because I need the other hand to cook)! But I was only thinking about when I cook, which as we all know, is cheap when you actually prefer to survive on garbanzo beans. Unfortunately I have a conference, and a dinner with a friend from out of town, and $30 won't cut it this week (which I realize defies the entire point, but whatever). Anyways, that will come soon.

Then I got all pumped up about 101 things in 1001 days, where you decide on 101 things to accomplish over roughly the next 2.75 years. Sounds productive. Also sounds like something I should work on listing out when I'm not flailing around in piles of busy-ness like I am right now. So that MAY come too (if I actually feel like putting it on the blog, which will likely only happen if I include a section on things I want to learn to cook).

SO. Here we are. I've settled on the 365 days challenge, where you take a picture a day for 365 days. I'm sure I'm way out of date on this, but it will still be fun! I actually take an inordinate amount of pictures (like, haha, look at this baking disaster or haha, look at this hilarious sign), so theoretically this won't be hard. We shall see. Despite what I'm about to post, I promise that all of the pictures won't be of Charlotte. I'll also put up normal stuff as well (I have ANOTHER wheatberry incarnation up my sleeve, but am almost afraid to put it up after the last two, so I'm waiting).

I am starting yesterday, because this is just too cute. Today's is upcoming.

Charlotte, with her cat grass. You can't see, but it exactly matches her eyes...

Sunday, September 27, 2009

Wheat Berries Round II: Balsamic Gorgonzola Deliciousness

Well, my wheat berry obsession is ongoing, prompting me to turn another dish I like into a wheat berry based dish, at least for the moment. The inspiration today is a spinach salad with apples (or pears), Gorgonzola, and walnuts with balsamic dressing. I like fennel in that salad sometimes, so you can toss that in for bonus points.

For those of you unfamiliar with wheat berries, here's what they look like:

I will also admit that my decision to make something with Gorgonzola was in no small part influenced by my desire for this pre-dinner snack:

At any rate... here is the skinny on the salad:

-2 shallots- sliced and carmelized (ooh, didn't see this one coming, did you? its worth the slow carmelization process, I promise, it adds a big level of deliciousness).
-1.5 coarsely chopped apples (the rest is your snack!)
-1 cup dry wheat berries, cooked*
-some walnuts, maybe 1/3c? toasted.
-about 2oz crumbled Gorgonzola
-about 1/3c simple balsamic vinagrette (balsamic vinegar, olive oil, salt, pepper)
-some very thinly sliced fennel

Combine together and chill.

This is how it looks:


It is DELICIOUS. The flavors just combine wonderfully- the warm taste of the toasted walnuts, the bite of the cheese, the freshness of the fennel, YUM.

*I have decided I can't advise you on the whole water:wheatberries ratio. I ended up following some advice I've gotten on other grains, which is basically to cook them like pasta- use a ton of water, boil them until they taste good (in this case 1-1.25 hours), and then drain in a strainer. Worked perfectly!

[[UPDATE! UPDATE!: so, I don't usually say this, but this was much better the first day I made it. I think it was because it was slightly warm, which made the caramelized shallots easier to taste, and the cheese a little softer. In eating the leftovers I actually ended up microwaving it a little (which didn't do as bad of things to the apples as you'd expect). Anyhow, I would not chill this until its cold, I'd just let it cool down and serve it either warm (not super hot, don't want the cheese to totally melt away) or room temp.]]

Friday, September 25, 2009

Thai Wheatberry Salad

I had an experimental dinner the other night. The version I made involved things like boiled over coconut milk that I have yet to fully get out of my stove, a miscellaneous assortment of leftover grains, and simultaneously burnt and raw chicken. But, surprisingly, the final product was pretty good. I'm going to tell you a bit about how I made it this time, but the recipe itself will be how I'm going to make it next time. Because I definitely will.

The whole idea came because I really wanted cold peanut noodles, but I'm trying to be healthy so wanted to bypass the noodle aspect of things. Instead, I arrived at a plan to use wheatberries cooked in coconut milk. I love wheat berries- they have a perfect texture for hearty grain salads. Unfortunately, I mis-read the internet, and cooked my wheat berries with a ratio of 4:1 liquid to grain rather than 2/2.5:1 which would have been better (hence the boiled over coconut milk). I also realized that I had a lot of extra liquid, so started adding bulgur (which cooks fast) on the fly. Either way, wheat berries have to cook a while so plan ahead. I then used a homemade peanut sauce, similar to this one. But later in the week, when I refreshed the leftovers a little, I realized the Trader Joes Spicy Peanut Vinaigrette (which is delicious) would have been fine.

So, here's what I came up with (which was really quite tasty)


And here is how I would do it next time:

Prepare ahead (or use leftovers)
:
-3/4c dried wheatberries, cooked in water and chilled (I get mine in the bulk grains area at Whole Foods; put about 2 c water in a pot with the wheat berries bring to to a boil, then simmer. The berries should become soft (but still a little chewy) and split a little. It can take an hour to cook them, or even more, so plan accordingly. You might need to add a little more water, so check on them).
-1 cucumber, seeded and chopped
-a small amount red onion, diced
-1/2 bell pepper coarsely chopped
-one large chicken breast, cooked, chopped
-bonus points for cilantro and chives

Toss all of it with Trader Joes Spicy Peanut Vinaigrette (or the home made peanut sauce below), chill. Enjoy! Makes great leftovers to take to lunch.

Yum! You could make it veggie by just omitting the chicken, or could add marinated tofu, although it would have to be really firm and probably pressed first in order to stand up, because this is not a delicate salad.

Peanut Sauce (slightly different than version for noodles, because more volume was needed as the grains will absorb some of it; all amounts are approximate- adjust it to your taste)
1/4c peanut butter (briefly microwaved, to soften and help convince it to mix with the other ingredients)
1/8c water
2T soy sauce
4T seasoned rice wine vinegar
.5T sesame oil
.5T spicy chili oil
red pepper flakes
diced ginger (1tsp or more)
diced garlic (1 tsp)

Sunday, September 20, 2009

Last man standing.

Ok, you will not BELIEVE this.

I have previously posted on the ongoing saga of my lime tree. We've gone through some highs and some lows. This summer I was pretty optimistic as there were actually a number of little contenders. But, then I moved (which caused widespread lime devastation), and it has been insanely ridiculously hot around here.

HOWEVER.

Look at this guy. Even if he doesn't get any bigger, this lime is definitely squeezable. HUURRAAY!

Thursday, September 17, 2009

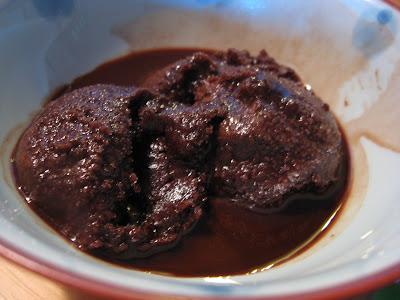
Chocolate Sorbet.... oh my goodness...

Beans, and whole grains, and fresh crispy summer veggies are all very well and good. But sometimes... sometimes, you just want chocolate.

Recently, I had one of those days, which just happened to correspond to a weekend when it was approximately one million degrees out (really, it was). What really seemed perfect was some chocolate sorbet. I have an ice-cream maker which is awesome, but I almost never use it. Therefore, the freezer bowl part of it wasn't frozen, and I was left to my own devices. Fortunately, I found a SUUUUPER easy recipe on Epicurean, that you just make in the freezer. And because of the wonders of the internet, now you, you lucky lucky reader, can have it too.

You need:
1c sugar
.5 c cocoa powder (the real stuff, this doesn't mean cocoa mix)
1.5c water
1tsp vanilla
a glug of kahlua (by the way, having made the vanilla extract and infused vodka, I'm now dying to make kahlua)

Mix together the sugar and cocoa and stir in the water. Heat it up slowly so that the sugar dissolves (if you heat things with sugar up too fast, they can get hot but the sugar is still grainy; this is conceptually related to why some people make bad grainy fudge, they're not heating it slow enough even though they get it to the right temperature in the end. I learned this after making a lot of bad fudge, myself). Boil it for a few minutes until it is dark, a little thick, and glossy- I read these instructions and thought, glossy? what? well, really, it does look glossy- just you wait. Then stir in the vanilla and kahlua, and let the whole thing cool.

Now, once you've done this, it makes this ridiculously decadent tasting syrup. Pop it in the freezer (once its cool! otherwise you will melt all of your nice little tupperware lunches!). Now, I'll say this. I was doubtful about this whole endeavor- I was pretty sure that this entire thing was going to be a chocolate flavored block of ice. But, it seems that the alcohol is not just there to make it delicious- it also changes the properties of the sorbet so it freezes nicely and not as a big block.

At any rate, this was DELICIOUS. Now, once out, it melted reeeeeeeaaaaallly fast- which is why taking this picture was challenging and it doesn't look that great. But, the frozen parts? out of this world. So dark and thick and with a strong purely chocolate flavor that had a little extra depth thanks to the vanilla and kahlua. I highly recommend it.

Sunday, September 13, 2009

A little break for a little Decoratin'

Recently I moved into a new (bigger! better!) apartment, and got some new (better! newer! more adult!) furniture. I love it. Charlotte loves it, as you can see here:

Also, for anyone interested, I previously posted about CidTalk. I ordered one of her Crops of the World pieces, and ended up getting all 4 (thanks!). I think they're great, and people comment on them all the time. Well, now I finally have a better place to hang them up!

At any rate, I am totally ecstatic about my new couches and grownup coffee table (replacing my home decoupaged one). But it was all looking a little bit formal, and I decided I needed something a little more relaxed and funky to make it feel like me.

Enter, the stick tree.

I'm not sure where the idea came from, but I went to the Orchid Warehouse (because my neighborhood has not only an inordinate amount of donut stores and psychics, and the Crapi apartments, but also an orchid warehouse) and picked up some dry willow branches (75cents each x 3 = a grand total of $2.25, can't beat that!). I then took a bunch of leftover paper from other projects (and pillaged a random origami paper pack I have despite being terrible at origami) to make leaves, which I hung using thread.

It is really really hard to take a picture of, but I'm really liking it...

Here is a closeup, since it is kind of difficult to capture what the leaves look like in person given that from any one angle you can't see all of them perfectly.


Its a little quirky, and it is very tall, but I like it!

Thursday, September 10, 2009

Chana Masala

Recently I went to Trader Joes (aka, my second home), and bought their frozen Chana Masala. Chana masala isn't even in my top tier of Indian food choices (I'm a saag kind of girl), but let me tell you, it was pretty delicious. Of course, having had it in all its deliciousness made me want to learn to make my own (because thats how I am).

So, a perusal of the internets began.I found a number of recipes, but this lady was by far and away not only the cutest of them all, but the biggest influence on my ultimate product.

(I preface this with my usual caveat about how I come from a Nordic people who do not make curry, so everything here is based on me liking stuff, not necessarily me being super authentic and making everything definitively. Plus, I like to experiment too much to make anything definitively, anyways).

SO!

Take a diced onion and slowly saute in some oil. I think that slowness is the key here, so that they get really soft, translucent, and a bit brown.

After they've been going for a bit, throw in a few cloves of diced garlic and some diced fresh ginger (I love ginger, so probably used about 3/4 of an inch of a plug of ginger). Then toss in a diced jalapeno (seeded). Let them cook until the onions are really nice and soft. Put in some cumin and coriander seeds and let them pop.

Now, dump in a can of crushed (crushed! must be crushed!) tomatoes, and stir around. Add 1/2-1tsp tumeric, 1/2 tsp red chili powder, 2-3tsp coriander, and stir it all up and let it cook a bit.

Then, dump in a can of drained chickpeas. Let it simmer for a while- you might need to add a bit of water, but this amount of tomatoes actually provides a lot of liquid. To thicken, just smush a couple of the chickpeas, which will release their starch. After its been cooking and the beans seem soft and the sauce tastes pretty good, add a little salt and 1/4-1/2 tsp garam masala. Right before you serve add a big squeeze of lemon and some cilantro and let that sit a second.

This was goooooooooood. And, cheeeaaaaaaaaap. (if you have your budget cooking basic ingredients, you are almost entirely good to go!).

Monday, September 7, 2009

Summer in a Skillet

Ok, I lied. The "Summer in your ear" (did I really call something summer in your ear? yes. yes I did) earring post was not the end of my summer series... THIS one is.

This is something I threw together (which, to be honest, is how most of my dinners come about), but it was really tasty. Basically, what we have here is whatever summer veggies were on sale. I got white corn (2 ears), 1 Anaheim chili, 2 small tomatoes, and some yellow squash. In just a little bit of olive oil I stir fried some onion and the chili, then threw in the squash, followed by the tomatoes (because I hate raw tomatoes and wanted them to be really cooked), and at the very end put in the corn, which I had cut off the cob*. I like to put the corn in at the end so its still crisp- then, add salt, pepper, and a splash of apple cider or white vinegar (this makes ALL the difference, it just makes everything taste fresh). When it was all ready I threw in a ton of fresh chopped cilantro.

I wanted to add a little protein because basically this was dinner (although it would make a great side dish), and I was too lazy to make chicken or something, so I threw in defrosted turkey meatballs from Trader Joes. It was so fresh and delicious! Perfect and easy for a hot summer day.


* I have an on-off relationship with Rachael Ray, but in an 'on' phase while watching her show I learned an awesome corn slicing trick. Take a big bowl, and put a much littler bowl upside down inside it. Balance the corn on one end on the little bowl and slice off the kernels- they all go into the big bowl and you don't get corn kernel shrapnel all over the place!

Saturday, September 5, 2009

Who needs Hostess?

I've posted here before about cupcakes... but, last week I made some cupcakes that topped even the super awesome margarita cupcakes from a while ago. I can't even wait, I have to show you the glamor shot right up front...

Yes, its true- its exactly like a hostess cupcake, except homemade and even more delicious. Yowza! The inspiration for the recipe comes from Our Best Bites.

The cake itself:
Now, she starts off with a recipe for homemade cake, and I'm sure that it is delicious. But, if I'm going to make 2 kinds of frosting, and insert them in every possible location in a bunch of cupcakes, it sounds like a good day to start off with cake mix. I used some kind of chocolate cake mix that was on sale, but I added a small package of pudding an and extra egg, just to make it denser. (by the way, if you want cakemix to be even better use melted butter instead of oil and milk instead of water. I was out of milk and all my butter was going to the frosting, though). So, make some cupcakes- I got about 18 out of it because I wanted them decently sized to aid with the stuffing. Let them cool, fortunately, you have a whole lotta frosting to make so there is plenty of time.

Inner Frosting:
This is without a doubt the weirdest frosting recipe I have ever seen, and I highly suggest you visit the original website for pictures. But, that said, I think that this frosting really made the cupcakes because it was the perfect texture.
You'll need:
3 T white flour
.5 C milk (I used non-fat)
.5 C actual real butter
.5 C sugar (granulated, not powdered)
1 t vanilla extract

Whisk together the flour and the milk while heating in a small pan on medium heat. Now, you have to whisk it continuously until it starts to get thick- let it cook a bit but keep stirring. Eventually, it becomes sort of gluey or puddingy looking. Apparently it just really won't work unless you let it get thick. Once that happens, you strain it- put a mesh strainer over a bowl and dump it in, and work it through with a spoon or rubber scraper. Let this chill completely.

Using a mixer (I used a hand mixer because its what I have) beat the butter and the sugar for a minute or two. Then, add in the flour/milk mixture and vanilla and keep beating. Do NOT freak out, it really looks gross. Just keep mixing- for mine, with the hand mixer and all, I had to go almost 10-11 minutes. And, part way through I was sure I was going to have to throw it out and just put the chocolate on top and be done (which, by the way, would have been delicious, just not super amazingly awesome like these were). So, persevere. It will eventually look like frosting and be fluffy and delicious!

Now, of course, you have to get this in the cupcake. There are 2 possible techniques. One involves some kind of magical frosting shooting tool that I don't have (see, I don't even know the name!). Then, there is the tact I took- use a sharp knife and carve out a little cone shaped piece of cupcake. Then, cut the bottom off the cone- you can imagine that if you replaced the top of the cone it'd be like the lid on a pumpkin and leave an internal hole for frosting. Here is one of mine, filled, waiting for a lid:


Top Frosting-
Now, I'd make this before you get going on carving up your cupcakes, because it has to chill. Basically, you're going to make a ganache- the recipe as it is was a little big, and I actually had left over frosting (I know, I know, this is not a tragedy ;). I'd never made this before, but it was super easy!
You need:
.75 C Cream
2 T real butter, melted
8 oz semi-sweet/dark chocolate, chopped up

Put chocolate in a bowl and pour melted butter over it (I did not read instructions, and dumped a whole cube of melted butter over it, which I then had to drain off, estimated how much I left behind, and everything was fine- this recipe seems to be fool proof. Either that, or you can never have too much butter). Place cream in pyrex measuring cup and microwave for ~2 minutes- it should be at a simmer, not boiling. Immediately pour over chocolate and cover bowl with plastic wrap. Let sit for somewhere around 3 minutes and then stir briskly until smooth. Let it cool- you can kind of decide when to use it, depending on your level of frosting skill. When I did it, it was somewhere between runny and thick- you could still pour it and it would spread out nicely, but it wasn't spreadable with a knife. It turned out so nice and shiny- check it out!

(by the way, I wasn't very happy with these photos, but I was very excited to sit down with a glass of milk and eat one of these things, and by the next day they'd be inhaled by my co-workers, so, this is the one for posterity!).

At any rate, look at the chocolatey goodness- you would never know the awesome filling that lurks within! These were a hit!

Thursday, September 3, 2009

Little flowers- summer in your ears!

Ok, to wrap up my end of summer series, here are a couple pairs of earrings I've made recently. I'm not normally a super flowery person, but these little beads were just so cute I had to use them for something.

First up, Hanging Garden Earrings, which are lightly hammered sterling silver curls spiraling down with little orange and white flowers on them.


And next, the Little Bite of Spring earrings. Now, these have a little story- basically, the 'stems' are repurposed out of a necklace I got while I was in Japan. When I got it, I had no idea what it was made of- it almost looked like silk cord, it had such an interesting blue green texture. Then, when I accidentally broke it, I realized that it was really made out of very very teeny tightly wrapped springs. (if anyone knows what this is called, I loooove it and would love to buy some, but I don't know how because I have no idea what it is called). So, I thought it was perfect for these little stems because it gives an otherwise really simple pair of earrings a sort of interesting texture.

LinkWithin

Related Posts with Thumbnails