Showing posts with label crafting. Show all posts

Saturday, January 17, 2015

Gossip Bench Makeover

I've never really been super organized, and one thing I am especially bad at is dealing with is stuff that comes in the door with me- mail, jackets, shoes, you know. It's like it explodes off of me when I walk in and then I can't bring myself to pick it up. My new apartment has a strangely wide hallway, which has lead me to decide to buy an actual standing coat rack for the first time in my life, and that's been a game changer, but there are still purses and shoes all over the place. A few years ago I decided that part of becoming an adult is realizing that while you might not actually change these things, you can get a lot of mileage out of working around your weaknesses. Like, I just CAN'T bring myself to take my shoes all the way to the closet, but I CAN chuck them in a basket. So, the next to the door shoe basket was born. I just needed one more thing....


I found this on Craigslist while looking for some kind of bench. It's a "telephone bench" or "gossip bench". You're supposed to sit on it and chat with the phone sitting on the table. I suppose I could have put my cell phone on there but it might have been overkill.

This thing didn't just show up like this:

When I got it, it was cute, but there were these kind of cheesy looking flowers on the back, and a lot of the finish was wearing off, especially on the desk (due in no small part to historically enormous telephones, I'm sure).

It sat around like this for a few months, while I spent an insanity filled 6 weeks full of Thanksgiving and Christmas and 2 conferences. Then, I finally decided to take action. I bought some semi-gloss paint at Home Depot, upon recommendation of the extremely patient Home Depot man who didn't even roll his eyes when I got completely stymied by the approximately one million shades of light greyish blue paint available. I then sanded it lightly with very fine sandpaper, but didn't do any primer because he said I probably didn't need it. I thought the bench seat looked pretty good, so decided to leave that as is.

The hardest part, by FAR was dealing with the spindles. I had to wrap them all with blue tape and then construct an elaborate drop cloth out of taped together kitchen trash bags (these pictures are extra bad because I was covered in paint and it was night time)


 I love how it turned out, it's the perfect size for dumping things, and I can hide the shoe basket underneath. Plus, I like how it's kind of unique. PLUS, I had never heard of these things before and got to spend time getting all obsessed with finding other people's super cute telephone bench makeovers like this one  and this one  and this one. It's really about the most I could expect out of any one piece of furniture!


Sunday, November 30, 2014

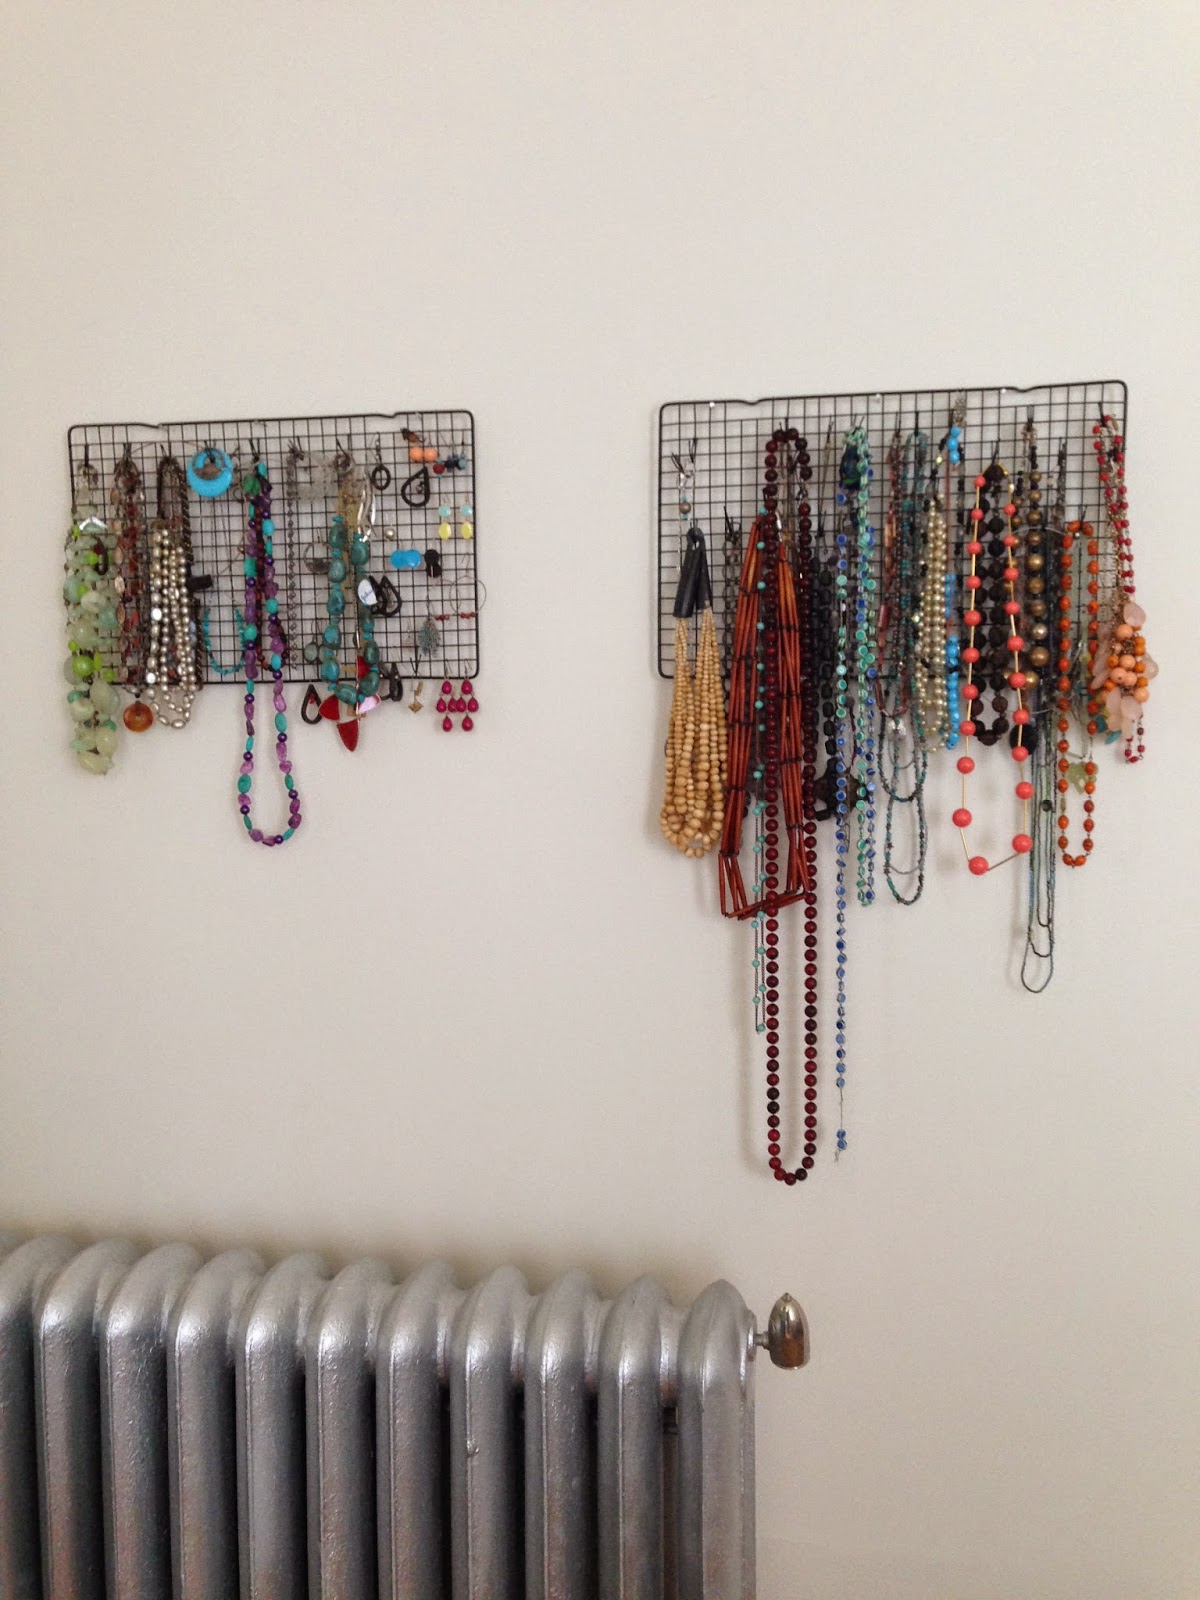
DIY Cookie Rack Jewelry Rack: Still Alive and Kicking


I think of all the things I've hacked together in the name of decorating, these jewelry racks made from kitchen cooling racks and bobby pins must be the most successful, because I have dragged them from apartment to apartment and I still love them. (Also, I have a necklace addiction problem, clearly).

It started out way back in 2010


And, it's still kicking!


Totally worth the 5 bucks I spent on supplies, by a long shot!


Tuesday, November 25, 2014

Adorable Wall Art Revisited


This wall art, made with some canvas, some stickers, and some paint, is by far the most popular thing I've ever posted, here or on pinterest (in terms of blog posts, it even managed to supplant the spinach, sweet potato, adzuki bean soup which was the top visited post for YEARS). Of course I brought it to my new place with me, and decided to give it a new location while I was at it.

You can also see my new rug, which I was initially slightly terrified of due to the huge bright pattern, but now I love it. It came from Home Depot, surprisingly.


The Bird Art collage came too!


Saturday, September 7, 2013

Easy Homemade Hanging Jewelry Rack (repost)

As another decorating re-post, here is a jewelry rack, made out of cooling racks! this has now moved coasts and apartments and is still going strong. This probably goes down as the single most useful thing I have ever made. Somewhat ironically, my actual cooling racks for food were lost in the move, so the only ones I own are nailed to the bathroom wall- I guess you win some, you lose some.


___________________________________

This idea came to me in a craft store, here is what you need for a little do it yourself action:
--a gridded baking cooling rack (preferably black)
--a package of black bobby pins
--needle nose pliers, or round nose jewelry pliers
--decoration, if you want (here, some discount Christmas berries. I also considered ribbon woven around the edge).


Take the rack, and put whatever decorations you plan to use on it first- this works better for things like the berries so that you can place your hooks around them. 

To create the hooks, take a bobby pin, and, from behind the rack, clip it onto one of the horizontal bars, so that its hanging straight down on the front. Then, take your pliers, and grip halfway up the bobby pin. Bend the bobby pin upwards so it forms a V pointing up, making a hook. You can space the hooks out as you want- I found that leaving an empty square between them helped a lot when hanging things.

For necklaces, be sure to leave enough space between rows for the pieces to hang. I made one square for necklaces and the other for earrings. On the earrings rack, I put a series of hooks at the top for hoops, and the other earrings I just hung through the squares by their hooks.

Once all your hooks and decorations are installed, nail it up!

Here is the finished product... so far, it is working fantastically! Its not only cute, it was veeery budget friendly. give it a try!

And- a year later, here it is (way loaded up) in its new home!

Sunday, July 28, 2013

Simple Easy DIY Wall Art


This is the reason I love Pinterest, despite the fact that if I see another adorable item unnecessarily placed in a mason jar and decorated with twine, I might lose it. I saw something on there, made a run to Michael's and Staples, and BAM! two days later, my hallway is all jazzed up.

This project is great because while it makes it look like you might actually have some artistic ability, in reality you just have to channel your 3rd grade skills in sticking on stickers and slathering on acrylic paint. Easy peasy.

First, here is the first inspiration, which I saw on Pinterest but traced it to "How About Orange", an adorable blog with tons of ideas that immediately got popped into my rss feed.

I like how simple her version is, but really what I needed was something big for the hallway. I felt like I had seen abstract flowers like that around but had a terrible time figuring out what to call them (for the record, apparently they are dandelions). Then, a google search revealed this piece by PitterPatter Press on etsy. If I hadn't already become bound and determined to make it myself, it would have been a good choice (and, much more delicately done than mine), but that ship had sailed so off I went.

Here is what you need:

--Art tape (surprisingly I found this at Staples and not Michael's- do NOT get some other non-art tape, this stuff was awesome). I got both 1/4 and 1/8 inch tape, so that there would be variability in the stem size.
--Stickers- unlike the tape, I'm clearly agnostic about sticker type. Basically, I wanted some variability in size, but if you get official mailing stickers they come in packets of hundreds, which I just didn't need. Luckily, down the aisle were a variety of other stickers. The smiley faces were surprisingly effective, as were the mailing seals- the price stickers were a little cheap and didn't stick as well
--Paint- I just got regular acrylic paint in a color I wanted. you will also need white paint (I used leftover primer from my dresser).
--canvas- now, I lucked out on this one- 24x30 canvases were on sale ($6 instead of $19!). I wanted mine to be big but just so you know, these really are pretty big!

Now, get going! 

First, you have to paint the canvas with the white paint and let it dry. This is boring because I know you want to get your hands on those stickers, but it's critical because the stickers just really don't stick that well to the plain canvas (I did a test). 

Once that is done and dry (overnight) put the tape and stickers on in a pattern you like- one thing to consider is balancing out the density of the flowers so it doesn't look like one side is weighed down, and also putting in variability in height. When you put the stickers on be sure to really push them down at the edges with your fingernail.

I made two because I have a whole lotta wall. Here is the other one (this picture is awful, sorry).

Next, paint over it all. Honestly it was a lot harder than I would have predicted to get an even coat, it definitely took multiple coats and then I had to go back and redo some spots. Am I some kind of expert painter? no way. Did I manage to successfully slather the whole thing with paint after literally staring at it with a flashlight to find white streaks? yes.

Let that dry (it does not have to be 100% dry). Now is the best part, which is peeling off the stickers. I can't even explain how satisfying this is.

And here you go! these are drying (the one on the right is on the shoebox lid to keep it from sticking to the floor).

Now, up on the wall! I suspect I might have hung them too high, but with my high ceilings it gets kind of confusing where to put things, I'm letting them stay there while I ponder it.

And here they are with my cloth-on-a-frame in the foreground:

Overall, this took a few days all things considered, but I really am happy with how they turned out. One thing I particularly like is how the white pops agains the dark background- it made me really glad I didn't pick a lighter shade of paint. Try it!

Wednesday, May 8, 2013

Big Wall, Big Problem

I have what you might call a "problem wall" in my apartment. The first thing you should know, is that my ceilings are pretty high. I love having high ceilings because it means there is a lot of light and also that I can wedge more into my hall closets than you could ever imagine. The down side is that I am too short to change lightbulbs even with a step ladder, and also that the walls can look a little bare.

The issue with the "problem wall", which was over my kitchen table, was partly that it was tall, and partly that it has the buzzer for the door, the electrical panel, a light switch and a mysterious pipe. So, nothing normal would cover all that up. After a little thinking, this is my problem wall, now:

This is the wall before (the only before pic was from when I was apartment searching,  so there are paint supplies and things, but you can see all the obstacles).

The main issue is that the light switch is not flat, so hanging a picture was out of the question (also, I don't really use that light switch anyways because the overhead light is ugly). I initially thought I'd get a canvas and paint it, and I did get a canvas that seemed huge at the store (2x3). But once I was at home I realized that a. 2x3 was not as big as I thought, and b. that I am not a painter and no matter what I did it looked like something an 8 year old made. So, on to plan B! I decided to make a frame and stretch fabric over it.

First stop: fabric.com where I also bought all the fabric for my quilt. You can see some of the things I was considering on my pinterest, which is the best thing for documenting shopping options I've ever found. The main hurdle was that this is really part of the living room, and the living room has tons of color, and a number of framed things as you can see (although the bright light from the windows makes it a little difficult to see what they are). I wanted something light and clean looking, so I tried to pick something that would coordinate with the light colors of the pillows and in the rug (not more red!).
This is what I picked- in real life it is more blue/grey then purple.
Then it was off to Home Depot where I bought 4 pieces of wood, each 48 inches long. To do this, I got  1x2's (as a side note if you are a wood buying newbie- the size it says it is won't be right. that is because you can get raw cut wood that is full of splinters and is actually 1 inches by 2 inches (or 2x4 or whatever) but when they smooth it down, obviously it gets a bit smaller). All I cared about was that the wood stuck out far enough from the wall to cover the light switch. The 1x2's were 8 feet long so I got a nice man at Home Depot to cut them for me, which he did for free. I also bought some nails that didn't look thick enough to split the wood, but did look long enough to go all the way through and into the other piece.

Then I nailed them together.

Then, I got excited so I put it up there to see how it would look. The red you can see is some tissue paper I taped together which I put up to check out spacing- as you can tell, it was a good idea because one of the main things I learned was that my initial idea about how big it needed to be was wrong. The tape is because I thought the fabric might sag, but it turned out to be a waste of both time and tape.

The first key step here was to IRON THE FABRIC and WASH THE FLOOR, otherwise it would be dirty and wrinkly, which is not what you're going for, here. Then I tried my best to line up the pattern with the edge, and went around and glue gunned the fabric. For some reason I cannot fathom, the wood did not seem exactly straight, but I soldiered on. If I had picked a less geometric pattern, I'd never have noticed, but, lesson learned. One of the benefits of this is if I get sick of the pattern, I can easily glue a new one on!

And... here it is!


Sunday, March 10, 2013

Easy Decorating Idea: Colorful Framed Paper


I got this really easy decorating idea from Pinterest (as usual). Unfortunately, (also as usual) someone didn't pin it carefully, so it isn't possible to track down the originator of the picture and cite them here (I also can't get the embedded pin to center itself- ah well).


Having just recently wrapped up the painting of the dresser, I've been thinking about the state of my bedroom. It was fine, but there was kind of a lack of coziness, I think because of all the white wall. I have tall ceilings, which I love, but it does mean there is a whole lotta wall to cover! Here it is, before:
Meh.

I went to Michael's to see what there was to see, and it turned out they were having a sale. I found the frames I used for 5 bucks each- I wasn't really willing to risk too much, because for all I knew this was going to look ridiculous. My criteria were: black, relatively thick frame, and the mat had to be included. 

Michaels also has a large paper selection, which is good, because picking out the paper was pretty challenging, actually. I noticed the original picture had a mix of sizes of patterns and colors. It also had to match my quilt. I tried to pick patterns that had some unique and some repeating colors so that every color was in at least one other panel. Fortunately, paper is pretty cheap (usually about 50 cents per sheet, but today 6 for $1, can't beat that!). So, I bought a bunch of extra just in case. The other perk here is that you can always switch up the colors later if you want a new look.

Be sure to clean the glass in the frames before putting the paper in. also, for geometric patterns, really make sure it's straight or else it'll look sloppy. (It was really hard to take these pictures without glare obscuring the patterns).


Other than picking the paper, the next hardest thing was clearly hanging them evenly spaced along the wall. Really, I don't have any magic solution for this, it involved a lot of measuring and remeasuring and making teeny dots on the wall and then doing math on my hand and swearing while I stood on the bed. But finally, I got them up!

Overall, I'm pretty excited about it! It didn't take that long, it brightened things up, and things look a lot cozier!


Sunday, March 3, 2013

A few new things in the shop!

Well, the title pretty much says it all...

First up, this little fish, which I realized is yellow and I should probably keep for myself as my mascot, but for now, it's up there!

Then there is this necklace, which I actually made out of old watch pieces that I bought when I was making my Steampunk Butler Munny

And finally a new version of my teardrop line of earrings, but instead of beads, made with more little gears

There are a few more....go on over and check it out!

LinkWithin

Related Posts with Thumbnails