Showing posts with label vegan. Show all posts

Thursday, May 15, 2014

Two-minute Take-it-to-work Salad

I usually like to take my lunch to work. It saves money, and makes me avoid eating pizza or something that comes from a truck (a delicious delicious truck) every day. But, sometimes you are just not on top of it enough to have anything to bring, which usually means I run around the kitchen dumping random food items into little tupperwares and eat lunch feeling like a toddler. 


NO MORE! I have discovered the easiest, fastest, salad on earth.

I don't think this can even legitimately be called a recipe.
Yes, it's in a tupperware, on my desk. Part of being the easiest fastest salad on earth is that no work is involved other than dumping stuff in a container, shaking it up, and carrying it away with you.

The superstar of the dish is something I just noticed at Trader Joes: the frozen Melodious Blend, which has a couple kinds of lentils, green garbanzo beans, and some tomatoes.
 
Basically, here is what I did. Get a pencil, because it's pretty complicated.
Dump an amount of Melodious Blend that is slightly less than you think you'll want to eat into the tupperware (this is because this stuff will end up being way more filling than you predicted as you poured out frozen beans in the cold morning light). Cut up some bell pepper (or whatever you've got). Dump that on top. Squeeze half a lemon over the whole thing (you could also use vinegar, you just need some acid). Drizzle a little olive oil over the whole thing. Sprinkle some spices straight on there. I was going for easy, which means no thinking, so I used Mediterranean blend, salt, and pepper. Put the lid on it and give it a shake.

It's frozen, but since all the beans are little and separate, don't even worry. Just take it with you, and by lunch time it is a perfect chilled salad temp. If this thing isn't driving to work, and waiting for you to go to the gym, and then waiting for you to toil all morning before you eat it, you could probably microwave it and get a nice warm lentil salad, or do it ahead and leave it in the fridge. But really, the beauty here is in having a healthy option that involves no planning whatsoever.

The next day (today!) I made another version:
This one had a little bit of kale in there, and used creole seasoning (again, a mix, for pure easiness). Both were great! You can see my plating here is just as elegant as it was yesterday.

Anyhow, if you're looking for a backup plan that you can keep in the freezer that will make you feel all nourished and healthy and give the illusion of being totally on top of this whole lunch thing, this is for you!

Tuesday, April 29, 2014

Cilantro Lime Pesto- Put This On Everything, Now!

I've had some kitchen issues, all of which were kicked off by a mouse who wanted to come in from the cold, set up camp in my oven, and refused to take any bait from any kind of mouse trap. He was finally vanquished, but had caused oven issues (in addition to the grossness factor), and until this morning when a replacement one arrived, my oven was non-functional. If it actually would warm up like it's supposed to, it might not be a big deal, but it's almost May, it's 45 degrees and raining, and I want to bake things!

The first thing I did to baptize the new oven was to roast cauliflower, which is one of my favorite things. I got the idea for the pesto from a friend, who told me a few weeks ago about a cauliflower-pesto combo that I've been thinking of ever since! I love pesto, normally, but this one is a little different and extra delicious. It also couldn't be easier.

What you need:
-big bunch of cilantro (I used a bunch and a half)
-juice of one lime, and zest
-1c olive oil (except, I used 1/2c oil and 1/2c water, and it worked just fine)
-1/2c nuts- I used 1/4c walnuts and 1/4c almonds
-3-4 cloves garlic
-a little salt
-red pepper flakes (or, jalapeno!)

What to do:
Put it all in the food processor or a really good blender, and push go. See, told you it was easy! Taste it, you want it to be balanced, not overpoweringly garlicky or salty, it should be fresh and bright and tangy. See how beautiful and green it is!

I roasted the cauliflower with olive oil, salt, and cumin, just toss it in those and stick it in a 400 degree oven (turning once or twice) until nice and brown. The beans were just cooked in a pan with cumin and corriander- super easy. I am really looking forward to having this on some fish or chicken, too (or you could do tofu, if that floats your boat).


Honestly, I want to put this stuff on everything!


Sunday, October 20, 2013

Halloweeny Salad: Black Rice and Purple Carrots


 This weekend while out and about, I ran across some awesome produce, which included some purple(ish) carrots. I'd never had them before, so obviously had to pick some up! As you can see, unlike some, these were mainly purple on the outside, but I think that makes them completely perfect for Halloween week.

 I was trying to think of something good to do with them- I was considering roasting them but got down a google-rabbit-hole and found this great recipe. I'd never used black rice OR  purple carrots, so bonus all around. Plus, I felt like I was getting sick (confirmed today, now that I have spent the day intermittently sleeping, watching the Lifetime Movie Network, and drinking tea with honey and lemon) and this salad is about as packed with super foods and antioxidants as you can get!

The recipe was from over at Scandi Home, and I made it almost just as recommended- this is my version. Actually, once you have all the ingredients, it was easy to put together.

The Stuff:
--1c non glutinous black rice (I used Natures Earthly Choice, which I found at my regular grocery store)
--zest of 1 lime
--juice of one lime (add half, then taste and add more if needed)
--1 tbsp vinegar- I used apple cider
--pinch salt
--1 tsp tamari
--1 tsp sesame oil
--3 tbsp sesame seeds
--5 purple carrots, grated
--seeds of 1/2 pomegranate
--3 tbsp chopped cilantro

What to do with it:
This is so easy. The hardest part is getting out the pomegranate seeds, so if you find those pre-seeded by all means go for it. Cook the rice, it took mine about 30 minutes and the water turns this amazing purple color. Drain it and let it cool slightly. Mix the lime juice and zest, oil, salt, and tamari together. Combine all the ingredients, pour the dressing over, and you're done! The original recipe called for pumpkin oil, which I didn't have and replaced with sesame, and I needed the extra lime to balance that flavor out- it probably depends a bit on your lime, so I'd taste it first.


This is also definitely fancy enough that you could serve it to guests and gets lots of ooohs and ahs. It could be a great appetizer, or larger servings could be a meal on their own. I only made a half batch, and I've already plotted to use up the rest of the carrots making more of it! I had mine with some Green Soup, made with kale I picked up along with the carrots (I've made this before and thought I posted it but it seems not, so that one is coming!). If all those vitamins don't knock down this sore throat I don't know what will!


Monday, July 22, 2013

Fast Dinners for When it is 1 Million Degrees Out: Part 1

Ok, so it has been hot. It has been TOO HOT TO BLOG.

What is this? The surface of the sun?
No, no, not quite. In reality, this is a precise rendering of my living room last week.

As you can see, Charlotte has actually melted.

Basically, no one in their right mind is going to cook anything in this situation, but I have been making the best of it and accumulated some cold meal ideas that I have been too lazy to write up. So, I'll be doling those out over the next week or so starting with this one, which is basically a pile of cool, refreshing (vegan) goodness.


First up, simple watermelon salad. I could live on this.
This couldn't be easier. You need: basil, lemon, and watermelon.  First, take some watermelon- I buy them in quarters because otherwise it's a race against time to eat the watermelon before it gets kind of mushy. Chop into slightly larger than bite size pieces. Now take your basil and chiffonade - this basically just means (after washing) stack up the basil leaves and slice them into thin strips. Now, sprinkle this on the watermelon and squeeze the juice of half a lime over the whole thing. Toss it. Eat it. Bask in the glory of the cold sweet watermelon and tart lime and refreshing basil. 

There are more elaborate versions with things like diced jalapeno, red onion, and feta, and that is delicious, but this is easier :).

Next up, little pita tacos. First, roughly chop a cucumber and slice some red onions. Put in a bowl with some red wine vinegar, olive oil, and a little dill, salt and pepper and let it sit. While that's happening you're going to make some hummus (or use store bought hummus, but the home made is SO EASY). Take a can of garbanzo beans, a big spoonful of tahini, juice of half a lemon, and a small clove of garlic- dump in food processor and run it until it looks like hummus (if it is too dry add a little water). Now, resist the urge to put too much garlic in because this is totally raw, and will really permeate the hummus especially as it sits. 

All you have to do is slather some half-pitas with hummus, top with the veggies, pick up like a taco and eat. This is barely even a recipe, but I like it because with a few basic staples (around here in summer cucumber is  definitely a staple- if I wasn't living on watermelon I'd live on cucumber salad).


Sunday, March 31, 2013

Fresh Avocado Summer Rolls

It is finally starting to feel at least a little like spring around here, and my pale, mildly cranky (with the weather) vitamin D deficient self is beyond excited about it. Part of what I'm excited about is getting a little more fresh produce- I am pretty sure I was not properly appreciative of California's constant abundance of fresh delicious fruit while I was there.

Anyhow, lately all I want to eat are things involving cold veggies- salads, sandwiches, and now... summer rolls! I got this idea in my head and had to make it happen immediately. The first challenge was finding the proper wrappers. At the first store, all they had were frozen spring roll wrappers. I bought them, however, after immediately panicking and googling it with my phone on the sidewalk, I determined that they were the wrong thing and are really meant for fried/baked spring rolls. What you actually want are rice paper wrappers. They are dry and should be on the shelf in the Asian section. These are the ones I got, but there are apparently many brands:
You can put almost anything you want in there. Your favorite veggies, chicken, shrimp, tofu- whatever! Anything you can put into long thin slices. I chose cucumber, red pepper, carrots, and instead of one of the protein choices, used avocado. You'll also want some type of herb- mint/cilantro/basil- I used cilantro. The important thing is to chop it all up ahead of time because you're going to need to move quickly.
Now- the rice paper will be very dry and stiff when you take it out of the package. I filled an 8x8 pyrex pan with warm water. Submerge a sheet until it is soft (not tooooooooooo soft, or it'll break. it'll also keep getting softer so if it feels a tad bid stiffer than you'd like when you first take it out, that's ok). I had a variety of badly shaped rolls, but when making the most successful ones, I  just immediately folded the rice paper in half, put the filling in the middle, then rolled it around the veggies as tightly as possible. I'm not going to lie, it was kind of hard to get it tight. I'm imagining it is similar to attempting to role nice looking sushi. They were all edible, but the half sized ones were definitely the most sturdy.
You could dip this in any variety of sauces, but I decided to make a simple peanut sauce (because I can't resist a peanut sauce). I used 3 tbsp peanut butter, 3 tbsp seasoned rice vinegar, 1 tbsp soy sauce, 1/2 tbsp sesame oil, and a squirt of sriracha (if you use regular natural peanut butter add a dab of honey. if you use peanut butter with sugar in it, then don't). This made a lot of sauce- definitely enough for two people.
(I wanted to cut a roll in half to take a lovely picture, but was afraid my rookie-rolls would fall apart, and it was my dinner, so I had a big interest in being able to eat it). 

The combination of the peanut sauce and the crunchy veggies and the creamy avocado- SO GOOD! I can definitely imagine these being a staple in the summer when it's hot out and the idea of turning on the stove or oven is overwhelming. They were really fresh and good- try it!

Sunday, March 24, 2013

Chickpea Avocado Sandwiches... nomnomnom

This is one of these recipes that I have been looking forward to making, and now that I did I can't imagine what I was waiting for. Behold, smashed chickpea and avocado sandwiches, from Two Peas And Their Pod. Basically, this is a really good (vegan) alternative to other salady sandwiches, and even if you don't care about the vegan-ness, the lack of mayo is definitely a plus for a lot of reasons.

This is all you need- a ripe avocado, a can of garbanzo beans, chopped garlic, salt, pepper, juice of half a lemon/lime. Now, you're going to want to rinse and drain the beans really well. I also tried to rub them around between two paper towels, and get as many of the skins off as possible (similarly to when I roasted them).

Now, just mash it all together! You want a variety of sizes of bean pieces.

That is basically all there is to it- just fix it up with your sandwich additions of choice (here, arugula and red pepper strips). If you want to save the rest of it, just squeeze the rest of the lemon on it and it should keep the avocado from oxidizing.

I really liked it, I'm sure I'm going to make this again!

Monday, January 21, 2013

Roasted Garbanzo Beans


Roasted garbanzo beans are one of these things that everyone else on the internet seems to have mastered and yet I can never get them right. Every six months or so I try again, and every six months or so I fail. This is the closest I have ever gotten to victory, so I'm just going to post it while I'm ahead!

Now, here is the lore of the roasted garbanzo bean: it's so cheap, just a can of beans! it's so healthy, so much protein! it's so easy, just throw them in the oven and roast! Hmm.

From my failures, I have deduced a few things.
1. you MUST taste them. if they are still soft inside, they will taste ok when they are super hot, and immediately start tasting gross when they cool
2. put oil on AFTER you roast them, otherwise it keeps the water from evaporating and they don't get dry.
3. forget what everyone says about cooking times, watch these buggers like a hawk.

Now! here is what I did:

The Stuff
--1 can beans (easy there, cowboy, you probably think you can put in a few cans at once- this relates directly to a past failure, if the beans are all bunched up, they won't dry- they need space!
--1-2 tsp olive oil
--spices of choice: here I used smoked paprika and salt. you could also do cumin/corriander or some people even do cinnamon sugar

What to do with it
Drain the beans and rinse very very well, shake them out in a strainer. Then, roll them around between 2 paper towels and try to get rid of the little skins that come off. Sprinkle with spices. Put them on a cookie sheet and toss them in the oven at 400.

This will now take about half an hour, but you have got to keep checking, and towards the end will have to sacrifice one bean per check, so you know if they're crunchy. Once they're done, toss them with the oil, and any additional spices (to taste).

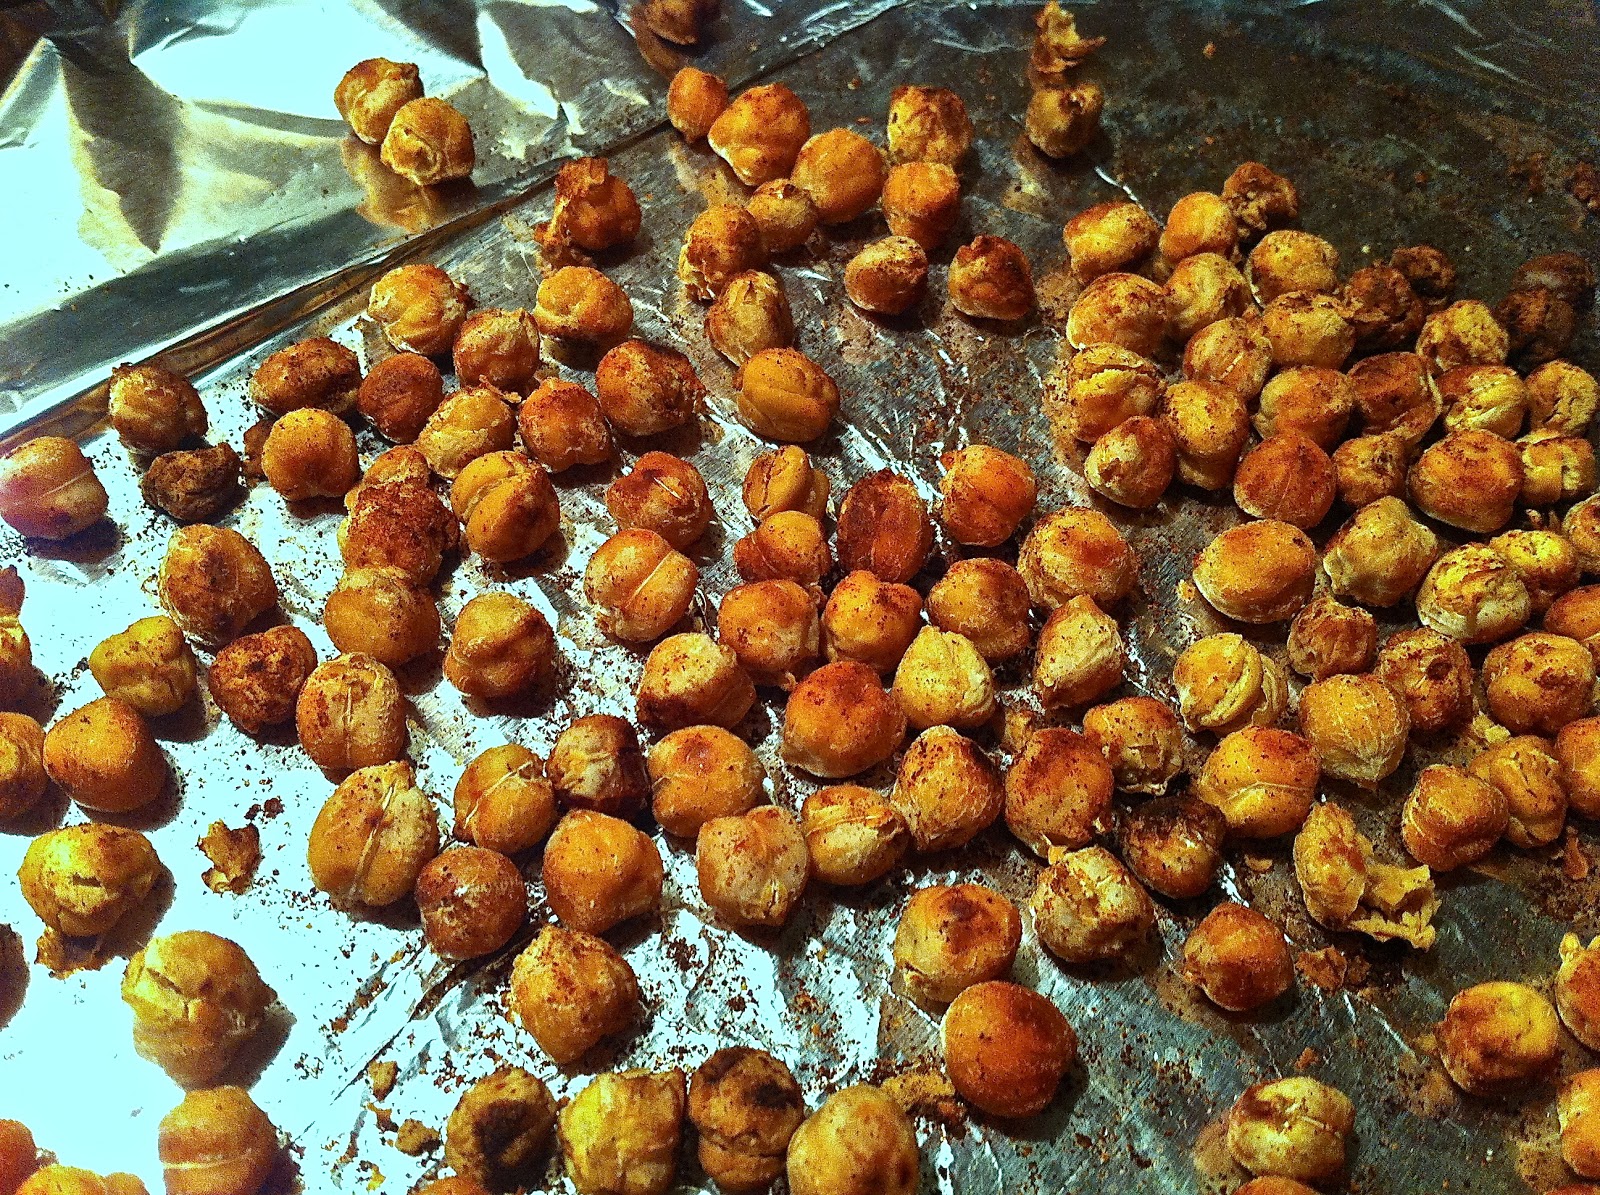
This was my first batch:
You will notice a large percentage of "very well done" beans. You don't want this. They do not taste good.

My second batch (made out of pure stubbornness) was much better.:

Now, what's the verdict? Well, I love smoked paprika and it gave it a nice barbecuey kind of flavor that was great. They were kind of crunchy, almost like corn nuts, which I also like. One thing to keep in mind is that it is very easy to eat a lot of these- the beans shrink up quite a bit so each can does not make a very big bowl (that is a cereal bowl in the picture). Because of this, it is entirely possible to eat an entire can of beans in a very short amount of time. Whether you want to eat an entire can of beans in a very short amount of time is a life choice you have to make for yourself. And if you were going to make these for a party or something, multiple cans would be required. Overall, they were pretty good, but they take so long to cook and were so finicky, now that I've actually conquered them, I'll probably never make them again (in this way they bear a similarity to the whole dulce de leche fiasco a few years back). Ah well.

Anyways, if you are really craving something crunchy, have plenty of time on your hands, and are dying to get rid of some beans, this snack is for you!


Saturday, October 20, 2012

The Amazing Dairy-free, Soy-free, Nursing Mother Friendly, Vegan Friendly, Fancy Chocolate Baptism Cake

***SPOILER ALERT*** this cake is delicious. it also has avocado in it. I am not even kidding.

So, the worlds cutest nephew (WCN) transitioned to being the worlds cutest Godson/nephew a while ago (this post is really really late, and the WCN in question is now 8 months old and crawling like a mad-man, but I kind of forgot to blog about it all in my post cake baking exhaustion. and I knew it would be long, so it's just been sitting here). Anyhow, I wanted to do something special for the event, and so got recruited to make the cake.

Now, WCN had a very sensitive little tummy, and poor WCN's Mom was on a very restricted diet as a result- this mean no dairy and no soy. She didn't request a cake without those things, but it just seemed like it would be too sad if she couldn't eat the cake. So, a search for an appropriate recipe commenced. A recipe for chocolate avocado cake had been kicking around between some of my fellow bakers and I, so I decided to give it a try. 

The stuff:
3c all purpose flour
6 tbsp cocoa powder
.5 tsp salt
2 tsp baking soda
2c sugar
1/4 c vegetable oil (I used canola in one, and coconut oil in another)
1/2c mashed avocado
2c water
2 tsbp white vinegar
2 tsp vanilla extract

What to do with it:
Preheat oven to 350 degrees, grease your pans (either 2 rounds, or 1 9x13)
Sift together dry ingredients, mix wet ingredients, gradually stir dry into wet.
Bake 30-40 min, but defer to a knife or toothpick if you are making a bigger cake.

Now, I'm not going to lie... I was so anxious about the avocado component that I test drove this recipe twice, both times not telling anyone about the secret ingredient until after they already decided that they liked it. Because this was not going to a vegan brunch, this was going to a big, carnivorous party, and it was going to be the only cake. It turns out there was no need- this cake is VERY moist and very chocolatey. It's not just a good cake considering the constraints on the ingredients, it's a good cake in any scenario. I would make it again, any time.

In addition to being anxious about the flavor, I also wanted this cake to be big and to be fancy (this was the WCNs big day, after all, and there is a big family involved). So, the first step was to make 3 9x13 layers, because there were a LOT of people coming. This thing weighed a ton. 

If you want to know how I came up with that amount, I used a handy-dandy cake portion calculatorThere were going to be ~50 people there, and the calculator said that 2 9x13 layers serve 45. I didn't want to be skimpy, so I made 3, but really, there was probably 1/3 of the cake left in the end, because this cake is very rich.

So, step one was to stack the layers up. A smarter person than I am would have sliced off the rounded top of each layer so that they stacked flatly without gaps on the side. I used a lot of frosting filling in those innocent little gaps you see there.

The next step is a crumb layer that can cover the edge of the cake and make a barrier between the cake (and its crumbs) and your fancy frosting layer. This is also when you fill in those gaps.

Now, I recommend this cake, hands down. I do NOT recommend my attempt at vegan buttercream. I just took a normal buttercream recipe and used Earth Balance. The issue that happened is that my kitchen was very hot (after baking 3 giant cakes!), and the Earth Balance separated at a lower temperature than butter would have and I the frosting started to separate. This required a trip to the store  at 11pm to start all the frosting over, and also involved actually scraping all the frosting off the cake once. So.... I'm not even going to share the recipe, I suggest finding your own.

After the crumb layer was on, I put in some blue food coloring to make it cute.

Now comes a cool trick I learned- I wasn't about to attempt to make fondant, but given that this was supposed to be fancy I wanted the buttercream to be smooth. I learned that the trick you do is to use paper towels. It sounds weird, but it totally works. Now, if you want completely flat buttercream you need completely flat paper towels, which is actually harder than you think. Viva brand paper towels are totally flat though, so just go for those. If you find a design you like, you can actually make little imprints in the frosting. Of course, I was not about to try this out on the actual cake without testing it first (and, I'm a scientist! obviously I had to test both methods). So, before putting the higher layers on, I tried it on layer 1. These pictures are not that great, but it was almost midnight at this point, so lets just say that lighting was not my top priority.
Basically what you are doing here is "ironing" the frosting, so get something flat. I'm sure there is something more more professional than a tea box, but, it works. Side note- that's my favorite tea.
This is the "viva" paper towel version- so flat!
This is the regular paper towel version, I think this pattern could actually be kind of cool but it would be REALLY hard to implement it well, in terms of matching up seams, getting it even, etc. (also, you can see here that the earth balance buttercream is starting to break down, this is right before I started over with that).

So, after frosting it with blue frosting, 'ironing' it, I made some darker frosting and put it on using a pastry bag. And here it is! 
You can see how the edges are wobbly, if I had sliced the layers so they laid flatter, that wouldn't have happened. I learned a lot though, and will definitely be trying this whole frosting technique again.

AND... noooobody had any idea about the avocado,  my sister and law could eat it, and everyone was happy!

To sum up an excessively long post:
1. this cake recipe is delicious, and I would try it whether or not it needed to be vegan
2. this technique for making buttercream frosting smooth works- it doesn't look like fondant, but it does look better than regular buttercream
3. nephew status: successfully baptized, and adorable

Saturday, June 23, 2012

Coconut Sorbet and Homemade Magic Shell (Vegan!)

Imagine the magic of a childhood treat... cold refreshing ice cream with a crunchy shell that you have to  crash through with your spoon to take a bite. Ahhhhhh.... Magic Shell! 

Now, somehow my adult self has avoided Magic Shell just because it seemed like there was no way something like that didn't have a million scary and bizarre ingredients. Then thanks to my good friend Pinterest, I found out you can make it yourself, at home, with only 2 simple ingredients.

Honestly, I'm not sure I am prepared to wield that kind of power.


But, now that I know this amazing secret for myself, who am I to keep it from you. So, here it is.

The pin I found for the topping was from the blog AlphaMom, and it looks like there is plenty of other good stuff to be found over there. But, first, I'm going to fill you in on the sorbet itself, because it's pretty amazingly simple as well.

Sorbet- what you need:
2 cans coconut milk (I used 1 whole fat and 1 light)
1/2 c shredded coconut
1/8 c sweetener (sugar or agave)

What to do with it:
Hang onto your hats, this is pretty complicated. Dump all the above ingredients into your trusty ice cream maker. Push "go". When it seems to be pretty well frozen, scoop it out and put it in the freezer in a tupperware. That's it!

"Magic Shell"- what you need:
1 1/4 c chocolate chips (if you want this to be vegan, then do your due diligence on your chip selection)
1/2 c coconut oil

What to do with it:
This is also VERY VERY COMPLICATED. Put the chips and oil together in a bowl in the microwave, and run for 1 minute or so until it's melted. Let it sit a minute then stir until totally combined. It's pretty runny at this point, but when you pour it over the ice cream it'll freeze right up!


This whole thing is kind of genius... basically, it's all capitalizing on the fact that coconut has a really interesting melting point (around 76 degrees). So, it you warm this up just a bit, it's melted, but as soon as it cools, it solidifies. You can keep it in the fridge and then warm it up a bit so you can pour some off to serve.

Overall, the coconut sorbet itself isn't too sweet, which makes it kind of nice and refreshing- plus, it's rich enough from the coconut milk to seem decadent without needing a lot of sugar. And seriously, there is something about whacking the chocolate sauce with the spoon that's just fun, that's all there is too it.


Friday, December 30, 2011

Save Yourself from Yourself Post-Holiday Kale Salad

If you're like me, the last few weeks have been chock-full of deliciously terrible things, like fudge and toffee and cookies of every shape and size. Oh, it was glorious. However, by the end, I felt something like this:

So, I made this salad immediately upon arriving home from my holiday family visit, and have made 2 more batches this week already. I actually ate it so many times I googled what happens if you eat too much kale. (answer: people say you CAN eat too much raw kale and it'll give you hypothyroidism. I didn't verify that information anywhere legit, though so don't take my word for it). So, moderation in all things, even raw kale, apparently.

At any rate, this was super easy, extremely delicious, kept well until the next day, and is good for you. What else can you ask for?

The stuff:
-1 bunch curly kale
-1 lemon
-olive oil
-salt
-pepper
-craisins
-walnuts
-parmesan (optional)

What to do with it:
Take the kale and cut out the really thick bottom portion of the stems. Stack the leaves on top of each other, and cut it into thin ribbons (you might need to cut it once lengthwise down the middle if they are too long)*. Put them in a bowl and squeeze all of the juice from the lemon onto the kale. Use your (clean) hand to squeeze or massage the kale for a few minutes- it makes it just a bit softer and also gets the lemon well mixed in. If you can, let it sit there for a bit, if you can't just proceed onwards. Pour about a tablespoon of olive oil over the leaves, add salt and pepper to taste, and toss with a fork. The, coarsely chop the craisins and walnuts and throw those in- these are the main source of calories so you can judge for yourself how much you want. I put in a lot of nuts because the dinner I was having was light and I wanted protein. If you'd like, you can grate in some good quality hard cheese (I used parmesan the first time and skipped it the other times). It does add a little something, but it is optional.

I ate mine with just a roasted sweet potato and it was delicious. The salad comes together extremely quickly, and if you microwave the sweet potato (roasted is better but microwaved actually is fine) you can have a very healthy dinner ready to eat in about 10 minutes. This may become a weeknight staple!


*note: for Christmas I got a very nice (VERY SHARP) chefs knife. I was really excited to use it, until about 30 seconds into my salad making experience I sustained an injury in the line of duty. Not to be thwarted, after taking important steps (like using half a box of bandaids and calling my Mom to tell her I got hurt) I took this picture with my left hand raised in the air above my head. I think it came out pretty well, all things considering. Lesson learned, when they say to curl your hands under while chopping, they're not kidding!

Thursday, December 22, 2011

Coconut Carrot Curry Soup

This is a really nice soup that you can throw together pretty quickly, but that is really warm and delicous and tastes way more complicated than it really is.

1 can coconut milk (usually I use light, but this was regular and oh, it was so decadent tasting)
5-6c water
2 big leeks
10-12 carrots, chopped
1 tbsp oil
1 inch plug of fresh ginger, chopped
2-3 tsp red curry paste (or to taste)
pinch of salt

Chop everything up, you'll ultimately blend it so don't get too bent out of shape about how they look, but they should be approximately the same size so they cook at the same rate.


Heat the oil in a large pot, toss in the leeks and ginger, and let it brown just a little. Then throw in the carrots. Cook for about 5 minutes. Then pour in the liquid. In general the amounts (like, of carrots/leeks/etc) don't matter so much, it isn't an exact recipe, but you want the liquid to cover the top of the veggies.

Add the salt and curry paste (I use the Thai Kitchen version, which they have in the ethnic section of my regular grocery store). If you like it spicier, add 3-4 tsp, less spicy, add 1. The only thing is, you don't want to overpower the taste of the carrots and end up with what basically just tastes like curry sauce, so I'd taste along the way.

Let it simmer for about 20 minutes, until everything is very soft. Then, blend with an immersion blender or else put it in a big blender. Continue to simmer a bit once blended so the flavors can really combine, then enjoy!

Given that it's basically just veggies and coconut milk it is amazing how rich this tasted, and the color is just amazing and bright. The only work is really the chopping, and then you just let it go- the whole thing takes about half an hour, of which 20 minutes is simmering. Definitely feasible for a nice winter week night dinner!


Friday, November 18, 2011

Thanksgiving: The Soup Course

Historically, I have been a little delinquent about getting things out in time for the actual holidays (you know, before the holidays actually occur and it's way too late for anything to be of any use). But, this year things are going to change... I'm going to post a series of recipes, old and new, that might be appropriate for inclusion in your Thanksgiving feast! These first two suggestions are two oldies but goodies.

Butternut Squash Soup
This is pretty delicious, not particularly difficult, and very seasonal.
http://yellowfishblog.blogspot.com/2008/02/comfort-food-squash-soup.html


10 Minute Pumpkin Soup
This is the fastest easiest soup ever. It's also light, so if you have a small cup of it, your stuffing eating potential will not be hampered in any way.
http://yellowfishblog.blogspot.com/2010/12/ten-minute-pumpkin-soup.html


As a side note, both of these soups are vegan, so if you have some vegetarian/vegan folks and are worried about having things that they'll be able to eat, these are definitely something that everyone can enjoy.

Sunday, October 9, 2011

Spicy Egyptian Couscous


This is a delicious, quick easy veggie recipe that makes a nice light but comforting dinner. I found it here, but these are my adaptations.

1 cup couscous (and 2 c water for cooking or else 1c water/ 1c broth)
1/2 an onion, chopped
1 tbsp. olive oil
1 zucchini, cut in 1/2-inch pieces
1 cup carrots, grated
1/2 tsp. coriander
pinch cayenne pepper (more if you like spice)
2 cloves garlic, crushed (or 2 tsp chopped garlic from the jar)
3/4 tsp. cumin
1 can garbanzo beans, drained
4 tsp. water

Cook the couscous by itself (just bring the 2c water to a boil, pour in the dry couscous, cover, and let it sit while you do the rest).

Heat up the oil and add the coriander, cayenne, garlic, cumin- stir for a minute, then add the onion, zucchini, and cook until soft. Then, pour in the beans and 4 tsp water. Combine with cooked couscous, stir, let sit a bit to mix, then eat! It also reheats really well in the microwave for lunch.

The flavors in this are nice- the carrots give it a sweetness, and if you put enough cayenne to get some heat, it makes a nice combination. The zucchini and extra water also make it very moist. Give it a shot!

Wednesday, August 24, 2011

Oh, Zucchini.

I'm sorry to have been such a delinquent hostess around these parts... I was on a lovely vacation, which has been followed by what can only be described as a data analysis frenzy. As a result of said frenzy, by the time I finish for the day the last thing I want to do is look at my laptop, I'd rather do more important things like pander to Charlotte's whims and watch the first season of Game of Thrones. You know, the important stuff.

At any rate, boy do I have a lot of backlogged recipes for you! To get through them, I might get a bit thematic... so today's post is brought to you by our old summertime friend, zucchini.

Zucchini #1
First, I'm going to tell you how to make the best grilled zucchini ever. You might be thinking "meh, I know how to grill zucchini" and planning to skim right past. But, do you really want to be making sub-par grilled zucchini for the rest of your life? Do you? I didn't think so. Fortunately, it's super easy, and only has 1 secret ingredient.
Here's what you do... take your zucchini and slice into appropriate sized pieces- small enough to cook through, big enough not to fall through the grill slats. Coat with olive oil, sprinkle with sea salt, pepper and... tumeric! It's the tumeric that does it. Much like when I used it in eggs, it doesn't give an aggressive flavor, but rather just adds another subtle level of taste that really really makes it delicious. Try it!

Zucchini #2
This recipe was borne of a need to put something together fast out of the things in my kitchen, but was actually delicious. It was inspired by this Egyptian style spicy couscous recipe, but here is my version.

The Stuff:
1c couscous
2c water
1 tbsp olive oil
1/2 large onion, chopped
1 zucchini, chopped
1/3-1/2c carrots, grated
1/2 tsp corriander
3/4 tsp cumin
pinch cayenne
2 cloves garlic, chopped
1/8c water
1 can drained and rinsed garbanzo beans

What to do with it:
Prepare couscous as usual (either according to package directions, or just boil the water, pour in the couscous, turn off the heat, cover, and let sit).

Heat oil, sautee onions, zucchini, and carrots until soft; add garlic, cayenne, cumin and corriander. Stir in beans, and add the extra water so the mixture is moist. Mix in with couscous, and there you go!

This was so simple, really flavorful, came together quick and reheated really well for lunch- what else can you ask for? Plus it's vegan, if you're into that kind of thing. Well worth a try!

Monday, June 20, 2011

Garbanzo Beans and Kale Bake

Now, we enter the phase in which I start to tell you the thrilling tale of how I used up CSA Box #1. I'm just warning you, there were a whole lotta greens in there, so get yourself ready.

This recipe was really good, and suuuuuuuuper easy. You really can't go wrong when there are so few ingredients!


The stuff:
1 onion, quartered and sliced
1 can garbanzo beans (or, white beans) drained and rinsed
4 cloves garlic
a big bunch of kale, rinsed, big stems removed, and chopped
Parmesan cheese- better quality is better, but all I had was the finely grated kind.
(also olive oil, salt, pepper)

What to do with it:
Take a 9x13 pan, dump the beans, onions, and garlic inside. Sprinkle salt and pepper according to taste (although, watch it with the salt, this starts tasting salty fast), and toss with about a tablespoon of olive oil. It might sound like a lot, but all the other ingredients are low calorie, and using olive oil as opposed to something like cooking spray makes a big difference with such a simple dish. Bake the mixture at 400, stirring occasionally, until the beans and onions are lightly browned. With the garlic and onions, it should smell delicious.

Once the beans are brown, put the kale in the pan, and stir it around. It'll shrink a bit, so don't worry if it looks like a lot. Be sure it is mixes well so the onions, beans, garlic, and oil get their flavor on the kale.  Once it's mixed liberally sprinkle the top with Parmesan cheese (if you want it to be vegan, it'd probably taste fine without it). Continue to bake at 400 until the kale is getting a little bit brown, and it seems softened.
This could make a great side dish, although I ate it as a light dinner just as is! It heated up really well for lunch the next day, too. This is definitely going to be a go-to way to cook greens in the future- it comes together quickly, and the ingredients are things that a well-stocked pantry should have on hand. Give it a try!

LinkWithin

Related Posts with Thumbnails