Showing posts with label decorating. Show all posts

Monday, April 27, 2015

Minimalist Botanicals (DIY Wall Art)


Last week involved a convoluted series of events in which I was working from home, had to flee my apartment for 2 hours to move my car to avoid the street sweepers because thanks to construction there are zero parking spots these days, so I had to find a coffee place with a parking lot, and next door to this coffee place with a parking lot was a Michael's, where they had a huge display out front of 3 for 1 canvases.

Naturally, I couldn't resist. Inside, I also found a giant pack of tissue paper. I wasn't sure what I wanted to do with it, but I figured at the very least my present wrapping needs would be taken care of for years. With some very long winded googling, I found a few pieces of inspiration: this one, and this one.

Still not sure what to do,  armed with canvas, tissue paper, and glossy ModPodge, I took a kind of aimless approach, and took one sheet of each color of paper and cut some large-ish petals (those were ultimately used in the red flower). I sorted them by color, and started messing around.


Before doing any gluing (mod-podging) I laid each of them out. This was really hard- I had use something to nudge them into place, and if I exhaled too hard, tissue paper went everywhere! I ended up taking pictures with my phone anytime I got something i liked, just so I could recreate it.


The important thing to remember is that the tissue becomes quite transparent, so you can't plan to have a light colored petal on top of a dark one and expect to see it (I learned this by practicing first on a piece of paper). That's why the outer pink petals are light and the top yellow lotus flowers are light. Once I had figured out the layout, I took everything off, and then one at a time put ModPodge on the canvas, and then again on top of each leaf. Be VERY gentle, if the tissue rips it is a real pain to get it off.

You can see my workspace, complete with most of the season of Walking Dead playing in the background. Nothing sets off floral art work like some disemboweled zombies.

Here are closeups of each one. The purple was the hardest, getting everything spaced out, but I think it's my favorite. I wish the yellow flower was a bit darker at the top, but I like it as well other than a few wrinkles that slipped in. Something about the way the tissue paper is so thin really makes the leaves look like they're almost painted on.


Now to find a place to hang them!

This could really be done with almost anything - these are, loosely a lotus, lilacs, and a dahlia. Give it a try!

Saturday, January 17, 2015

Gossip Bench Makeover

I've never really been super organized, and one thing I am especially bad at is dealing with is stuff that comes in the door with me- mail, jackets, shoes, you know. It's like it explodes off of me when I walk in and then I can't bring myself to pick it up. My new apartment has a strangely wide hallway, which has lead me to decide to buy an actual standing coat rack for the first time in my life, and that's been a game changer, but there are still purses and shoes all over the place. A few years ago I decided that part of becoming an adult is realizing that while you might not actually change these things, you can get a lot of mileage out of working around your weaknesses. Like, I just CAN'T bring myself to take my shoes all the way to the closet, but I CAN chuck them in a basket. So, the next to the door shoe basket was born. I just needed one more thing....


I found this on Craigslist while looking for some kind of bench. It's a "telephone bench" or "gossip bench". You're supposed to sit on it and chat with the phone sitting on the table. I suppose I could have put my cell phone on there but it might have been overkill.

This thing didn't just show up like this:

When I got it, it was cute, but there were these kind of cheesy looking flowers on the back, and a lot of the finish was wearing off, especially on the desk (due in no small part to historically enormous telephones, I'm sure).

It sat around like this for a few months, while I spent an insanity filled 6 weeks full of Thanksgiving and Christmas and 2 conferences. Then, I finally decided to take action. I bought some semi-gloss paint at Home Depot, upon recommendation of the extremely patient Home Depot man who didn't even roll his eyes when I got completely stymied by the approximately one million shades of light greyish blue paint available. I then sanded it lightly with very fine sandpaper, but didn't do any primer because he said I probably didn't need it. I thought the bench seat looked pretty good, so decided to leave that as is.

The hardest part, by FAR was dealing with the spindles. I had to wrap them all with blue tape and then construct an elaborate drop cloth out of taped together kitchen trash bags (these pictures are extra bad because I was covered in paint and it was night time)


 I love how it turned out, it's the perfect size for dumping things, and I can hide the shoe basket underneath. Plus, I like how it's kind of unique. PLUS, I had never heard of these things before and got to spend time getting all obsessed with finding other people's super cute telephone bench makeovers like this one  and this one  and this one. It's really about the most I could expect out of any one piece of furniture!


Sunday, November 30, 2014

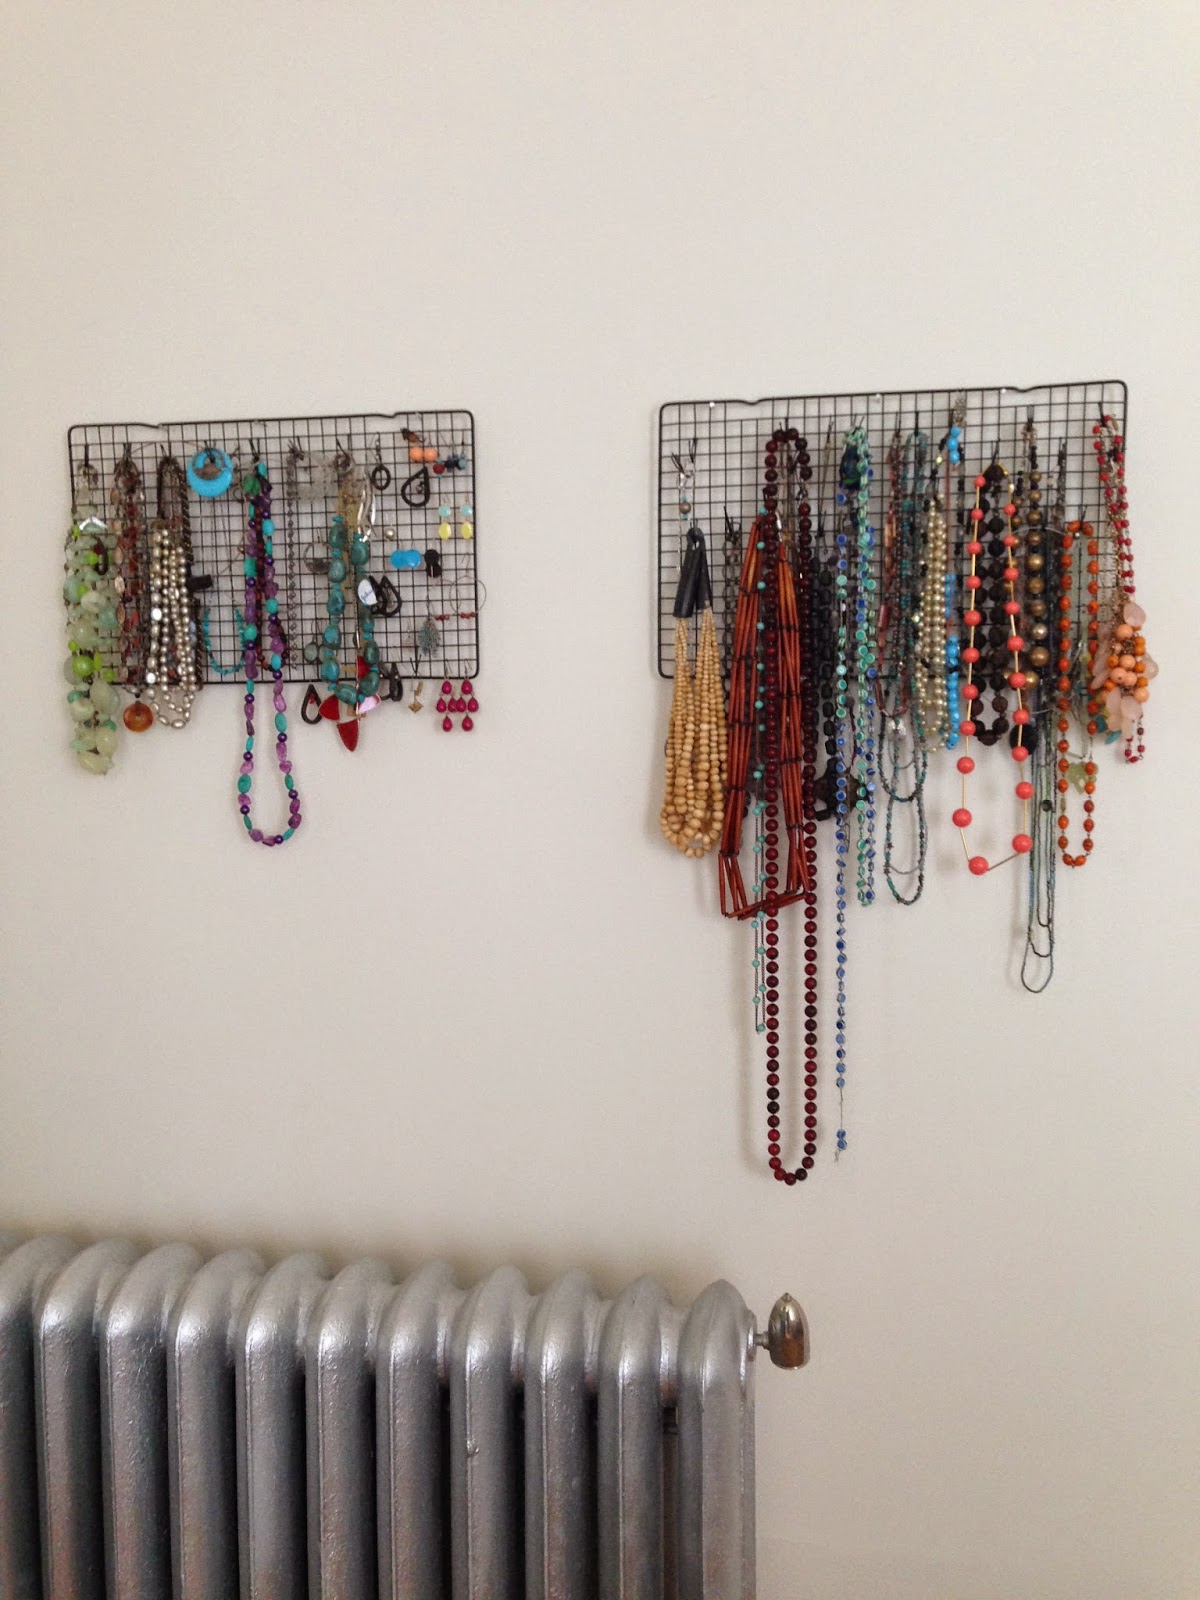
DIY Cookie Rack Jewelry Rack: Still Alive and Kicking


I think of all the things I've hacked together in the name of decorating, these jewelry racks made from kitchen cooling racks and bobby pins must be the most successful, because I have dragged them from apartment to apartment and I still love them. (Also, I have a necklace addiction problem, clearly).

It started out way back in 2010


And, it's still kicking!


Totally worth the 5 bucks I spent on supplies, by a long shot!


Tuesday, November 25, 2014

Adorable Wall Art Revisited


This wall art, made with some canvas, some stickers, and some paint, is by far the most popular thing I've ever posted, here or on pinterest (in terms of blog posts, it even managed to supplant the spinach, sweet potato, adzuki bean soup which was the top visited post for YEARS). Of course I brought it to my new place with me, and decided to give it a new location while I was at it.

You can also see my new rug, which I was initially slightly terrified of due to the huge bright pattern, but now I love it. It came from Home Depot, surprisingly.


The Bird Art collage came too!


Saturday, November 22, 2014

Something Old Someplace New- The Dresser's New Home

As I mentioned in my last post, I moved, and brought a lot of old friends with me.

Here we have my massively revamped dresser, all settled in, in it's new place!

This dates back to my dresser makeover post a few years ago so I thought I'd repost. It was an IKEA Malm dresser in birch that got an overhauling using O'verlays, some paint, and some knobs. I had initially been concerned about how bright it was, but now I love it!


Sunday, November 9, 2014

Put a Cork in it!

Instead of going on some long diatribe about how I've been busy, all kinds of things have been happening and I moved, which meant I ate leftover things from my cabinets for at least a month and trust me no one wants to read about that, I'm just going to jump right in.

Behold, the great doorway makeover of 2014.

So, backing up a teeny bit... I moved! (I loved my old apartment, but the people who owned the building loved it more and decided to sell it). One perk of moving is the chance to clean everything out, but also to get/make new stuff. I'm going to do a couple of posts on how some of the things I made for my old place fit into the new one, but first, there were a few things to do to get this one in shape. It's a "railroad" or "shotgun" style apartment which means it's just a bunch of rooms all in a line, the perk of this is that I have all kinds of space, just in a weird layout.
Now, you can see the first problem in the foreground... because the fire escape is in the kitchen, at the far end, the bedroom, at the front, has an emergency exit to the hallway. It's a really cute vintage looking door (see?)


Although right next to the adorable doorknob with the adorable teeny little key, you can see the problem.... the giant pane of glass, letting people in the hall see into the apartment, and also letting all the light from the hallway in all night. You can see the elegant solution I used for the first few weeks:

Then I decided to make lemonade out of my lemons. By which I mean, a bulletin board out of my giant hallway window.

Step 1:
There needed to be some kind of base - I had initially looked into window decals, but all of those are designed to let light in. Then I looked into contact paper, but apparently it is almost impossible to get out of glass. So, I had to cut a specially sized piece of foam board and wedge it in there. I used double-sided foam tape to stick it in.

Step 2. 
Then I had to attach the cork, which came in a big roll (the cork in the roll is nowhere thick enough by itself- it's probably only as third as deep as a pushpin would go). Getting the cork stuck up there was no small thing. I first tried the sticky tape (this picture is blurry because there was just a lot going on).

This whole thing worked brilliantly until about 4am the next morning, at which point the cork started ripping and unpeeling making a noise like a deadly animal was trying to scratch through the door, which I have to say, is quite a way to wake up in the dark. Charlotte was having no part of it and immediately ran to the other end of the apartment. I ended up gluegunning in the middle of the night, which was a first. Basically, it's just really really hard to get the cork to stick to tape-like things, because the top layer of cork dust comes off covers the tape, and you're totally screwed.

Step 3.
Once everything was attached, I put a little border up, using cute tape, to cover the edges where they didn't always perfectly meet the door.
This stuff also had a little trouble sticking to the cork, and had to be subsequently glued, but I still think it looks cute!

Step 4.
The top is way over my head so didn't seem to have a lot of need for cork, but I did cover it with cute paper on top of the foamboard.

And... the final product!


Monday, May 26, 2014

New Wall Art: Put a Bird (or three) on it!


This was a spontaneous weekend project. It happened after a similarly spontaneous living room rearrangement (I am convinced that rearranging the furniture periodically is good for your brain) that left a new piece of open wall.

I found this pinterest board, which was chock fill of ideas, and one of them was this bird art silhouette from over at Tater Tots and Jello, which was actually a guest post from the blogger at Crap I've Made. If I'm going to be perfectly honest, I am incredibly jealous of that blog name, since making crap and blogging about it is a favorite activity of mine.

I was really intrigued because it reminded me a bit of my previous venture into canvas wall art, in that it uses blocking off negative space as a substitute for an actual ability to paint anything that looks like anything (this my previous attempt, which has more than 1600 repins, making it possibly the most popular thing I've ever made in my life).

This one is a little different because the base layer isn't just white paint, this time it is a collage. So, first, you've got to cut up some stuff and make one. This takes a while. I would recommend paper scraps that don't include much white- you want it to contrast with the color of the paint you're using. All I had to cut up were my hoard of back issues of the New Yorker which I perpetually intend to get through. I was a little concerned about this plan since it is so text heavy, but actually there is really cool art in there, so it worked out pretty well. In related news, when you spend your evening cutting up back issues of the New Yorker to make a project you found on Pinterest after spending the afternoon potting herb plants in organic potting soil, you start to wonder what kind of a cliche you have become.

These are my supplies:

This is my collage (do you have any idea how many back episodes of True Blood it took to make this thing? Quite a few). You might see that down at the bottom the pieces are bigger. That is because at that point, I thought the only place that the underneath would show through was in the top third. I did want paper everywhere so the paint would look uniform.

Then you have to figure out what to put on this thing. The original post used pictures from sillohouttes.com, but they wouldn't print out big enough for what I wanted (I had spent enough time on the collage that I wanted to be able to see it!). So I drew and cut out some really basic birds and leaves. I actually had to cut them out a number of times to keep making them bigger (see the stray one at the bottom?)

Once you settle on a design, you have to outline it. What I did, was to hold it down, and lightly brush the paint outwards all the way around it, to make a slight outline of the birds.

Using that, I could then trace the outline with my brush (see, no real painting ability needed!).
I went through the whole area around the birds, and realized I was kind of sad because there were some parts of the collage I had gotten kind of attached to (although I had tried to capture some of them under the birds).

I decided to make it sort of purposely undone at the bottom, to allow some color to balance out the higher up birds, and I like how it looks. Unfortunately, since I had done a bad job on purpose at the bottom, I ended up having to redo it using my many leftover scraps.

Then just cover it over. As with the grey hallway art, this takes a ton of cheap acrylic paint. I made it so brush strokes sort of pulled down to almost over the bottom part, leaving about 1/5th of it still colored. In case you are wondering, this whole enterprise made an enormous mess:

Then it was time to hang it! I'm planning to spray it with an acrylic fixer, but want to give it a full day to be sure it is all dry underneath, since there a a few different layers of paint and modpodge going on.

I like how it turned out it's colorful, and also way different than anything else I've got going on.


You could pretty much make any pattern here, Just be sure the resolution of the cut up pieces for the collage are small enough so that whatever cut out you put on top allows you to see different swatches of color. Have fun with it!


LinkWithin

Related Posts with Thumbnails