Saturday, April 23, 2016

Zoodles... not just for dinner anymore!


It's been almost a year since my last post... in that year, both my parents passed away, we cleaned out my childhood home, and frankly, I felt much more like like eating cookies, drinking wine, and watching old episodes of Murder She Wrote than blogging. But, spring is supposed to a time of renewal, and I thought I'd see if I could get back at it.

This recipe was borne out of the idea that I really wanted hashbrowns, and had started cooking onions and peppers to go in them when I realized that if you put one of those bags of refrigerated shredded "just potatoes!" in to the freezer, they turn into a giant block of ice that you can't separate even if you smack it on the counter repeatedly. SO, I turned to my longtime friend, zoodles.

Basically, all that was involved here was sautéing onions and peppers in a little bit of butter, tossing in the zoodles, and then cracking in two eggs. You don't have to let the zoodles cook much, because they will as the eggs cook.

 
Let them cook for a bit, then eventually you'll decide you're about to die of starvation waiting for the eggs to cook, so cover them with a lid until the whites become firm.


At this point, I was worried I would never get them out of the pan intact, so decided to take a pre-emptive photo.

But... voila!

This was really good- lighter than a traditional breakfast but it was still tasty and felt fancy. Definitely going to do it again!


As a side note, Murder She Wrote is amazing comfort TV, there is a surprisingly vast array of guest starts, and, I mean look, just look, at these sets! (there are an inordinate number of excessively fancy bathrooms).

Monday, April 27, 2015

Minimalist Botanicals (DIY Wall Art)


Last week involved a convoluted series of events in which I was working from home, had to flee my apartment for 2 hours to move my car to avoid the street sweepers because thanks to construction there are zero parking spots these days, so I had to find a coffee place with a parking lot, and next door to this coffee place with a parking lot was a Michael's, where they had a huge display out front of 3 for 1 canvases.

Naturally, I couldn't resist. Inside, I also found a giant pack of tissue paper. I wasn't sure what I wanted to do with it, but I figured at the very least my present wrapping needs would be taken care of for years. With some very long winded googling, I found a few pieces of inspiration: this one, and this one.

Still not sure what to do,  armed with canvas, tissue paper, and glossy ModPodge, I took a kind of aimless approach, and took one sheet of each color of paper and cut some large-ish petals (those were ultimately used in the red flower). I sorted them by color, and started messing around.


Before doing any gluing (mod-podging) I laid each of them out. This was really hard- I had use something to nudge them into place, and if I exhaled too hard, tissue paper went everywhere! I ended up taking pictures with my phone anytime I got something i liked, just so I could recreate it.


The important thing to remember is that the tissue becomes quite transparent, so you can't plan to have a light colored petal on top of a dark one and expect to see it (I learned this by practicing first on a piece of paper). That's why the outer pink petals are light and the top yellow lotus flowers are light. Once I had figured out the layout, I took everything off, and then one at a time put ModPodge on the canvas, and then again on top of each leaf. Be VERY gentle, if the tissue rips it is a real pain to get it off.

You can see my workspace, complete with most of the season of Walking Dead playing in the background. Nothing sets off floral art work like some disemboweled zombies.

Here are closeups of each one. The purple was the hardest, getting everything spaced out, but I think it's my favorite. I wish the yellow flower was a bit darker at the top, but I like it as well other than a few wrinkles that slipped in. Something about the way the tissue paper is so thin really makes the leaves look like they're almost painted on.


Now to find a place to hang them!

This could really be done with almost anything - these are, loosely a lotus, lilacs, and a dahlia. Give it a try!

Thursday, April 23, 2015

A New Blog to Check Out- "Healthy, Con Gusto!"

I have a list of blogs on the sidebar, which rotates according to which ones were most recently updated, but I just wanted to take a minute to highlight this brand new blogger, "Healthy, Con Gusto!".

She has a lot of healthy recipes, with a lot of Peruvian flair. A few that I'm excited to try are a dairy free arroz con leche and a healthy-fied version of Lomo Saltado, which is a delicious beef dish.

Go on over and check it out!

Sunday, April 19, 2015

Refreshing Kale Peanut Salad


This weekend it was FINALLY (finally finally finally) actually, legitimately warm.

I'm talking this kind of warm:

and this kind:

and best and most fabulous of all, this kind:

In celebration, I decided it was time to start busting out the summertime salads. I found this one over at Once Upon a Chef which also was the source of the very delicious Thai Quinoa salad, which actually had a similar flavor profile. My version is below:

The Stuff:
Kale, a few large handfuls
1 cooked chicken breast (or equivalent; optional)
half a cup sliced almonds, toasted
half a red bell pepper, chopped
3/4c carrot pieces (mine were chopped baby carrots)
handful of cilantro, roughly chopped

dressing:
1.5 tablespoons peanut butter
2 tablespoons rice vinegar
1 garlic clove
chunk of ginger (or about 2 teaspoons minced ginger)
.5 tablespoons soy sauce
1.5 tablespoon sesame oil
juice of half a lime
red pepper flakes or chili sauce
pinch salt

What to do with it: 
The dressing is easy, basically take all of the ingredients and blend them up in whatever way you like best (mini food processor, blender cup) or just chop as finely as you can with your own two little hands, and mix very well.

For the salad itself, first prepare the kale. Remove the hard spines, and then the key is to hold a bunch of leaves together in your hand and cut them in small strips (chiffonade). If your strips are a little on the large size, as mine are you should massage it, which just means to squish it in your hands a bit so it is softer. Then, add the other ingredients, toss with dressing, and there you go!

It was very refreshing, plus, I'm a sucker for a good peanut sauce. The nice part about this one is that it's peanuty but really not to heavy. The other nice thing about kale salads is that they really hold up in the fridge, and even though this is half the original recipe, there are lots of leftovers. This is definitely going into the summer rotation!


Friday, April 3, 2015

Avocado Lime Pesto

I've posted before about my obsession with zoodles (zucchini noodles), so I'm always looking for something new and exciting to put on them. One thing I love is pesto, but since it ends up being mostly olive oil, nuts, and cheese, it doesn't always feel like a healthy option... LUCKILY,  I found this recipe over on Cara's Cravings, always a reliable source.

Unfortunately, bright green noodles aren't 100% photogenic, so I had this twice before I got around to trying to blog about it!

I made this whole thing in the smoothie cup of my Ninja blender, which is possibly the best thing I have ever purchased for myself. Besides all manner of green smoothies for breakfast, it makes things like this super fast, and the smaller volume of the smoothie cup works better for small batches than a large food processor does.

This is what you need for the pesto:
- 1/2 avocado
- a BIG bunch of basil, washed very well
- 2-3 cloves garlic
- pinch salt
- half a lime worth of juice
- a little water to help it blend

Basically it could not be easier- dump that all in the blender, hit go, and wait until it's smooth.

I had the pesto multiple times on zoodles- once with mini thai flavored turkey patties (mixed with basil, cilantro, fish sauce, ginger, and grated carrots) and once with a piece of frozen tilapia from Costco, which I marinated in lime juice and herbs. But in addition to the zoodles, it was awesome on top of eggs, on top of chicken- basically, on everything I ate that week! It's much brighter and more refreshing than typical pesto, and would be perfect for all kinds of summer dishes. Try it!

Friday, March 20, 2015

Etsy Shop Reboot II: Teardrop Series

I mentioned in my last post that I started my etsy shop back up again, so I figured I'd take the chance to highlight some of my favorite stuff. This whole line of wooden teardrop earrings includes some of my favorites, they're all listed as part of the "Teardrop" series.

I've made a lot of different versions of these over the years, my friends call them "the yellowfish earrings", and one of the reasons I like them is because even after selling them for years I still haven't seen much else like them. I also like them because the overall design is amenable to so many different versions- the "gear drop" design, which I've made a few different iterations of,  is probably my favorite.


Sunday, March 15, 2015

Etsy Shop Revamp

Well, this week I decided to dust off my long defunct etsy shop... I've run out of walls in my apartment to art projects for,  and run out of furniture to paint, so I need some way to make things to avoid going crazy. I'll probably put up a few posts highlighting some of my favorite sets of things that are up there. Take a look!

In this post I want to show you this really basic line of small hoops. Basic, but super comfortable and useful!

These little pearl earrings are my some of my favorites, and also the thing I've sold the most of. Everyone who's gotten them loves them. The reason I like them is that they're kind of fancy but as a non-pearl-stud-type-person the hoop makes them feel more casual. They're also totally comfortable, you can sleep in them, talk on the phone, whatever.


After I liked those so much, I made a series of different versions. They're listed in the shop as the "Simplicity" series.


Saturday, January 17, 2015

Gossip Bench Makeover

I've never really been super organized, and one thing I am especially bad at is dealing with is stuff that comes in the door with me- mail, jackets, shoes, you know. It's like it explodes off of me when I walk in and then I can't bring myself to pick it up. My new apartment has a strangely wide hallway, which has lead me to decide to buy an actual standing coat rack for the first time in my life, and that's been a game changer, but there are still purses and shoes all over the place. A few years ago I decided that part of becoming an adult is realizing that while you might not actually change these things, you can get a lot of mileage out of working around your weaknesses. Like, I just CAN'T bring myself to take my shoes all the way to the closet, but I CAN chuck them in a basket. So, the next to the door shoe basket was born. I just needed one more thing....


I found this on Craigslist while looking for some kind of bench. It's a "telephone bench" or "gossip bench". You're supposed to sit on it and chat with the phone sitting on the table. I suppose I could have put my cell phone on there but it might have been overkill.

This thing didn't just show up like this:

When I got it, it was cute, but there were these kind of cheesy looking flowers on the back, and a lot of the finish was wearing off, especially on the desk (due in no small part to historically enormous telephones, I'm sure).

It sat around like this for a few months, while I spent an insanity filled 6 weeks full of Thanksgiving and Christmas and 2 conferences. Then, I finally decided to take action. I bought some semi-gloss paint at Home Depot, upon recommendation of the extremely patient Home Depot man who didn't even roll his eyes when I got completely stymied by the approximately one million shades of light greyish blue paint available. I then sanded it lightly with very fine sandpaper, but didn't do any primer because he said I probably didn't need it. I thought the bench seat looked pretty good, so decided to leave that as is.

The hardest part, by FAR was dealing with the spindles. I had to wrap them all with blue tape and then construct an elaborate drop cloth out of taped together kitchen trash bags (these pictures are extra bad because I was covered in paint and it was night time)


 I love how it turned out, it's the perfect size for dumping things, and I can hide the shoe basket underneath. Plus, I like how it's kind of unique. PLUS, I had never heard of these things before and got to spend time getting all obsessed with finding other people's super cute telephone bench makeovers like this one  and this one  and this one. It's really about the most I could expect out of any one piece of furniture!


Saturday, January 10, 2015

Collard Green Wraps- Who Knew?


As most of you probably did, I spent December in an orgy of cookies and candy and delicious cocktails. I'm not going to lie, it was spectacular. BUT, now it's time to get things back in hand. I decided to do a modified version of a Whole 30 (modified to include the vegetarian options since I just can't stand eating that much meat everyday), which has been great for getting me back into cooking and I've tried a bunch of new recipes.

This one isn't really a recipe so much as a concept. Sandwiches are pretty much off the table for the time being (which is a little rough given that I'm a sucker for a good sandwich, and even have a series of past posts called "The Gallery of Sandwiches", chronicling the best sandwiches I have encountered). Honestly, though, I normally just eat leftovers for lunch so it's not actually any kind of big deal. But, if the craving strikes, this trick is worth a try. I learned it from YJP over at Broccoli is for Lovers.

I have never given collard greens a lot of thought. I've had the Southern side dish version of them and just never liked it. BUT, they are super cheap and have gigantic flat leaves that it turns out are totally perfect for a wrap. The only prep I did was to cut down the spine a little bit, because it's kind of big.

Then, just lay out your ingredients. This was tuna, but it would also be good with the avocado chickpea salad, or really anything else you'd do in a wrap.
(immediately after taking this picture I realized that everything has to be oriented in the same direction for better wrappability, but this was more photogenic)

Then, you know, wrap it!

I will say that one of the perks of these things is that the leaves are really pretty :).

I was surprised at how well this worked- the leaves themselves have a really benign flavor that doesn't have much of an impact on the flavor of the filling, but they also make it taste really light and a little crunchy. It's good I liked it, because my grocery store sold these in ENORMOUS bunches (for  only 59 cents a pound!), so I have wraps for weeks (some of these may become green smoothie fodder). Anyhow, sounds weird, but totally worth a try!


Sunday, November 30, 2014

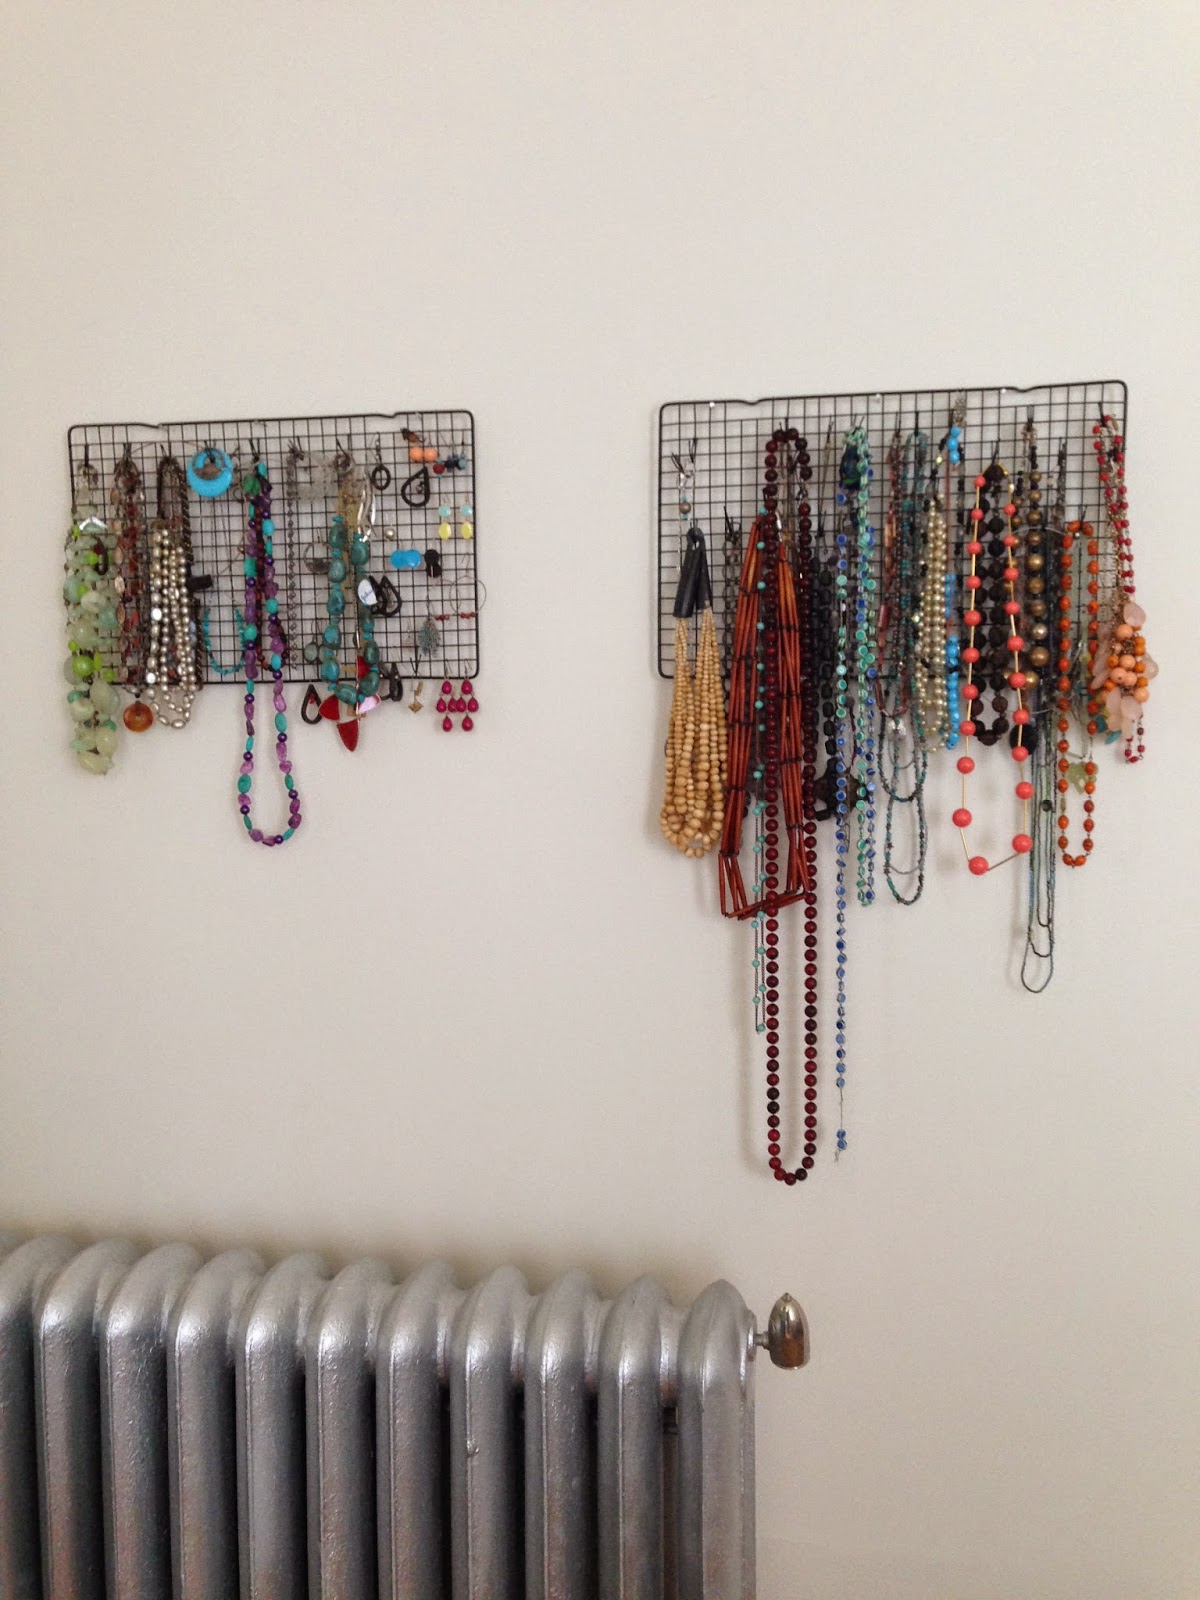
DIY Cookie Rack Jewelry Rack: Still Alive and Kicking


I think of all the things I've hacked together in the name of decorating, these jewelry racks made from kitchen cooling racks and bobby pins must be the most successful, because I have dragged them from apartment to apartment and I still love them. (Also, I have a necklace addiction problem, clearly).

It started out way back in 2010


And, it's still kicking!


Totally worth the 5 bucks I spent on supplies, by a long shot!


Tuesday, November 25, 2014

Adorable Wall Art Revisited


This wall art, made with some canvas, some stickers, and some paint, is by far the most popular thing I've ever posted, here or on pinterest (in terms of blog posts, it even managed to supplant the spinach, sweet potato, adzuki bean soup which was the top visited post for YEARS). Of course I brought it to my new place with me, and decided to give it a new location while I was at it.

You can also see my new rug, which I was initially slightly terrified of due to the huge bright pattern, but now I love it. It came from Home Depot, surprisingly.


The Bird Art collage came too!


LinkWithin

Related Posts with Thumbnails